Services description#
This section provides more details on functions of the LP services.
Databases can be omitted in the following figures.
See the table with the resource consumption of each of the services listed below in the "Resource consumption by services" section.
General information about services#
Worker processes#
For LUNA PLATFORM services, you can set the number of workers to use additional resources and system memory to process requests to the service. A service will automatically spin up multiple processes and route traffic between the processes.
When starting the service in a Docker container, the number of workers is set using the WORKER_COUNT parameter.
For example, if you set the value WORKER_COUNT=2 for the Faces service, then the service will consume 2 times more resources and memory.
Note the number of available cores on your server when utilizing this feature.
Worker processes utilization is an alternative way for linear service scaling. It is recommended to use additional worker processes when increasing the number of service instances on the same server.
It is not recommended to use additional worker processes for the Remote SDK service when it utilizes GPU. Problems may occur if there is not enough GPU memory, and the workers will interfere with each other.
Automatic configurations reload#
LP services support the auto-reload of configurations. When a setting is changed, it is automatically updated for all the instances of the corresponding services. When this feature is enabled, no manual restart of services is required.
This feature is available for all the settings provided for each Python service. You should enable the feature manually upon each service launching. See the "Enable automatic configuration reload" section.
Starting with version 5.5.0 the configuration reload for Faces and Python Matcher services is done mostly by restarting appropriate processes.
Restrictions#
Service can work incorrectly while new settings are being applied. It is strongly recommended not to send requests to the service when you change important settings (DB setting, work plugins list, and others).
New settings appliance may lead to service restart and caches resetting (e. g., Python Matcher service cache). For example, the default descriptor version changing will lead to the LP restart. Changing the logging level does not cause service restart (if a valid setting value was provided).
Enable automatic configuration reload#
You can enable this feature by specifying a --config-reload option in the command line. In Docker containers, the feature is enabled using the "RELOAD_CONFIG" option.
You can specify the configurations check period in the --pulling-time command line argument. The value is set to 10 seconds by default. In Docker containers, the feature is enabled using the "RELOAD_CONFIG_INTERVAL" option.
Configurations update process#
LP services periodically receive settings from the Configurator service or configuration files. It depends on the way of configurations receiving for a particular service.
Each service compares its existing settings with the received settings:
-
If service settings were changed, they will pulled and applied.
-
If the configurations pulling has failed, the service will continue working without applying any changes to the existing configurations.
-
If check connections with new settings have failed, the service will retry new configurations pulling after 5 seconds. The service will shut down after 5 failed attempts.
-
-
If current settings and new pulled settings are the same, the Configurator service will not perform any actions.
Database migration execution#
You should execute migration scripts to update your database structure when upgrading to new LP builds. By default, migrations are automatically applied when running db_create script.
This method may be useful when you need to rollback to the previous LUNA PLATFORM build or upgrade the database structure without changing the stored data. Anyway, it is recommended to create the backup of your database before applying any changes.
You can run migrations from a container or use a single command.
Single command#
The example is given for the Tasks service.
docker run \
-v /etc/localtime:/etc/localtime:ro \
-v /tmp/logs/tasks:/srv/logs \
--rm \
--network=host \
dockerhub.visionlabs.ru/luna/luna-tasks:v.3.22.22 \
alembic -x luna-config=http://127.0.0.1:5070/1 upgrade head
Running from container#
To run migrations from a container follow these steps (the example is given for the Configurator service):
-
Go to the service docker container. See the "Enter container" section in LP 5 installation manual.
-
Run the migrations.
For most of the services, the configuration parameters should be received from the Configurator service and the command is the following:
alembic -x luna-config=http://127.0.0.1:5070/1 upgrade head
-x luna-config=http://127.0.0.1:5070/1 — Specifies that the configuration parameters for migrations should be received from the Configurator service.
For the Configurator service the parameters are received from "srv/luna_configurator/configs/config.conf" file.
You should use the following command for the Configurator service:
alembic upgrade head
- Exit the container. The container will be removed after you exit.
exit
API service#
LUNA API is a facial recognition web service. It provides a RESTful interface for interaction with other LUNA PLATFORM services.
Using the API service you can send requests to other LP services and solve the following problems:
-
Images processing and analysis:
-
Face/body detection in photos.
-
Face attributes (age, gender, ethnicity) and face parameters (head pose, emotions, gaze direction, eyes attributes, mouth attributes) estimation.
-
Body parameters (age, gender, accessories, headwear, colors of upper and lower clothing, type of sleeves) estimation.
-
-
Search for similar faces/bodies in the database.
-
Storage of the received face attributes in databases.
-
Creation of lists to search in.
-
Statistics gathering.
-
Flexible request management to meet user data processing requirements.
Remote SDK service#
The Remote SDK service is used to:
- Perform face detection and face parameters estimation.
- Perform body detection and body parameters estimation.
- Create samples.
- Perform extraction of basic attributes and descriptor, including aggregated ones.
- Process images using handlers and verifiers policies.
Face, body detection, descriptor extraction, estimation of parameters and attributes are performed using neural networks. The algorithm evolves with time and new neural networks appear. They may differ from each other by performance and precision. You should choose a neural network following the business case of your company.
Remote SDK with GPU#
Remote SDK service can utilize GPU instead of CPU for calculations. A single GPU is utilized per Remote SDK service instance.
Attributes extraction on the GPU is engineered for maximum throughput. The input images are processed in batches. This reduces computation cost per image but does not provide the shortest latency per image.
GPU acceleration is designed for high load applications where request counts per second consistently reach thousands. It won’t be beneficial to use GPU acceleration in non-extensively loaded scenarios where latency matters.
Aggregation#
Based on all images transferred in one request, a single set of basic attributes and an aggregated descriptor can be obtained. In addition, during the creation of the event, the aggregation of the received values of Liveness, emotions, medical mask states for faces and upper/lower body, gender, age and the body accessories for bodies is performed.
The matching results are more precise for aggregated descriptor. It is recommended to use aggregation when several images were received from the same camera. It is not guaranteed that aggregated descriptors provide improvements in other cases.
It is considered that each parameter is aggregated from sample. Use the "aggregate_attributes" parameter of the "extract attributes" (only for faces) and "sdk" requests to enable attributes aggregation. Aggregation of liveness, emotion, and mask states for faces and upper body, gender, age and the body accessories for bodies is available using the "aggregate_attributes" parameter in the "generate events", provided that these parameters were estimated earlier in the handler, as well as in the "sdk" request.
An array of "sample_ids" is returned in the response even if there was only a single sample used in the request. In this case, a single sample ID is included in the array.
Descriptor formats#
LUNA PLATFORM supports the following descriptor formats:
|
Descriptor format |
File content |
Size |
|---|---|---|
|
SDK |
Set of bytes (descriptor itself). |
Size depends on neural network version (see "Neural networks" section). |
|
Set of bytes indicating the version. |
Size is 4 bytes. |
|
|
Set of signature bytes. |
Size is 4 bytes. |
|
|
Raw |
Set of bytes (descriptor itself) encoded in Base64. |
Size depends on neural network version (see "Neural networks" section). |
|
XPK files |
Files that store descriptor in SDK format. |
Depends on the number of descriptors inside the file. |
Note: Raw and XPK files are deprecated. It is recommended to work with the SDK format.
SDK and Raw formats can be directly linked to a face or stored in a temporary attribute (see "Create objects using external data" below).
In most extraction requests, the descriptor is saved to the database as set of bytes, without being returned in the response body.
There are several requests that can be used to get descriptor in SDK format:
- request "sdk";
- request "get temporary attributes and "get temporary attribute.
With LUNA PLATFORM, it is not possible to get descriptors in Raw and SDK formats. You can use other VisionLabs software to get these formats (eg LUNA SDK). Descriptors obtained using the above resources or using the VisionLabs software are referred to as raw descriptors.
Use raw descriptors for matching
The descriptor formats described above can be used in requests for the use of raw descriptors.
An external raw descriptor can be used as reference in the following resources:
- "/matcher/faces"
- "/matcher/bodies"
- "/matcher/raw"
- "/handlers/{handler_id}/events" when "multipart/form-data" request body schema is set
- "/verifiers/{verifier_id}/verifications" when "multipart/form-data" request body schema is set
- "/verifiers/{verifier_id}/raw"
An external raw descriptor can be used as a candidate in the following resources:
Create objects using external data#
You can create a temporary attribute of face by sending basic attributes and descriptors to LUNA PLATFORM. Thus you can store this data in external storage and send it to LP for the processing of requests only.
You can create an attribute or face using:
- Basic attributes and their samples.
- Descriptors (raw descriptor in Base64 or SDK descriptor in Base64).
- Both basic attributes and descriptors with the corresponding data.
Samples are optional and are not required for an attribute or face creation.
See the "create temporary attribute" request and "create face request" for details.
Checking images for compliance with standards#
The Remote SDK service enables you to check images according to the ISO/IEC 19794-5:2011 standard or user-specified thresholds using three ways:
- Request "iso".
- Parameter "estimate_face_quality" of the request "detect faces".
- Group of parameters "face_quality" of the policy "detect_policy" of the request "generate events".
For example, it is necessary to check whether the image is of a suitable format, specifying the "JPEG" and "JPEG2000" formats as a satisfactory condition. If the image fits this condition, the system will return the value "1", if the format of the processed image is different from the specified condition, the system will return the value "0". If the conditions are not set, the system will return the estimated value of the image format.
The list of estimations and checks performed is described in the "Image check" section.
The ability to perform check and estimation of image parameters is regulated by a special parameter in the license file.
Enable/disable several estimators and detectors#
By default, the Remote SDK service is launched with all estimators and detectors enabled. If necessary, you can disable the use of some estimators or detectors when launching the Remote SDK container. Disabling unnecessary estimators enables you to save RAM or GPU memory, since when the Remote SDK service launches, the possibility of performing these estimates is checked and neural networks are loaded into memory.
If you disable the estimator or detector, you can also remove its neural network from the Remote SDK container.
Disabling estimators or detectors is possible by transferring documents with the names of estimators to the launch command of the Remote SDK service. Arguments are passed to the container using the "EXTEND_CMD" variable.
List of available estimators:
| Argument | Description |
|---|---|
| --enable-all-estimators-by-default | enable all estimators by default |
| --enable-human-detector | simultaneous detector of bodies and bodies |
| --enable-face-detector | face detector |
| --enable-body-detector | body detector |
| --enable-people-count-estimator | people count estimator |
| --enable-face-landmarks5-estimator | face landmarks5 estimator |
| --enable-face-landmarks68-estimator | face landmarks68 estimator |
| --enable-head-pose-estimator | head pose estimator |
| --enable-deepfake-estimator | Deepfake estimator |
| --enable-liveness-estimator | Liveness estimator |
| --enable-fisheye-estimator | FishEye effect estimator |
| --enable-face-detection-background-estimator | image background estimator |
| --enable-face-warp-estimator | face sample estimator |
| --enable-body-warp-estimator | body sample estimator |
| --enable-quality-estimator | image quality estimator |
| --enable-image-color-type-estimator | face color type estimator |
| --enable-face-natural-light-estimator | natural light estimator |
| --enable-eyes-estimator | eyes estimator |
| --enable-gaze-estimator | gaze estimator |
| --enable-mouth-attributes-estimator | mouth attributes estimator |
| --enable-emotions-estimator | emotions estimator |
| --enable-mask-estimator | mask estimator |
| --enable-glasses-estimator | glasses estimator |
| --enable-eyebrow-expression-estimator | eyebrow estimator |
| --enable-red-eyes-estimator | red eyes estimator |
| --enable-headwear-estimator | headwear estimator |
| --enable-basic-attributes-estimator | basic attributes estimator |
| --enable-face-descriptor-estimator | face descriptor extraction estimator |
| --enable-body-descriptor-estimator | body descriptor extraction estimator |
| --enable-body-attributes-estimator | body attributes estimator |
You can explicitly specify which estimators and detectors are enabled or disabled by passing the appropriate arguments to the "EXTEND_CMD" variable, or you can enable (by default) or disable them all with the enable-all-estimators-by-default argument. You can turn off the use of all estimators and detectors, and then turn on specific estimators by passing the appropriate arguments.
Example of a command to start the Remote SDK service using only a face detector and estimators of a face sample and emotions.
docker run \
...
--env=EXTEND_CMD="--enable-all-estimators-by-default=0 --enable-face-detector=1 --enable-face-warp-estimator=1 --enable-emotions-estimator=1" \
...
Handlers service#
The Handlers service is used to create and store handlers and verifiers.
The data of handlers and verifiers are stored in the Handlers database.
Send events to third-party service#
LUNA PLATFORM provides the ability to send notifications via web sockets or web hooks (HTTP). This is facilitated by the "callbacks" policy.
Sending notifications via web sockets
The "callbacks" policy with the luna-ws-notification parameter provides a notification mechanism based on WebSocket principles. This type of callback allows receiving events through web sockets from the Sender service, which interacts with the Handlers service via the pub/sub mechanism through the Redis channel. This ensures direct, instant data updates using a bidirectional communication channel between the client and server.
Advantages:
- Direct, instant data updates via web sockets.
- Efficient use of an open bidirectional channel.
- Low latency in notification delivery.
In previous versions of LUNA PLATFORM, the "notification_policy" was used. It is now considered deprecated and is not recommended for use. The main advantage of the callback mechanism over the deprecated "notification_policy" is the ability to specify multiple callbacks with different filters in the handler creation request, resulting in only one event being sent.
See detailed information in the "Sender service" section.
Sending notifications via web hooks
The "callbacks" policy with the http parameter provides a notification mechanism based on webhook principles for HTTP. They ensure asynchronous interaction between systems, allowing external services to react to the occurrence of events. Within this policy, you can specify specific parameters such as protocol type, external system address, and authorization parameters and data.
Advantages:
- More flexible notification setup mechanism.
- Easy integration with various external systems.
- Uses familiar HTTP protocols and configurations.
Image Store service#
The Image Store service stores the following data:
- Face and body samples. Samples are stored in Image Store by the Remote SDK service or you can save an external sample using the "samples" > "detect faces" and "samples" > "save face/body sample" requests.
- Reports about tasks. Reports are stored by the Tasks service workers.
- Any objects loaded using the "create objects" request.
- Clusterization information.
Image Store can save data either on a local storage device or in S3-compatible cloud storage (Amazon S3, etc.).
Buckets description#
The data is stored in special directories called buckets. Each bucket has a unique name. Bucket names should be set in lower case.
The following buckets are used in LP:
- "visionlabs-samples". This bucket stores face samples.
- "visionlabs-bodies-samples". This bucket stores human bodies samples.
- "visionlabs-image-origin". This bucket stores source images.
- "visionlabs-objects". This bucket stores objects.
- "task-result". This bucket stores the results received after tasks processing using the Tasks service.
- "portraits". This bucket stores portraits. The bucket is required for the usage of Backport 3 service.
Buckets creation is described in LP 5 installation manual in the "Buckets creation" section.
After running the Image Store container and the commands for containers creation, the buckets are saved to local storage or S3.
By default, local files are stored in the "/var/lib/luna/current/example-docker/image_store" directory on the server. They are saved in the "/srv/local_storage/" directory in the Image Store container.
Bucket includes directories with samples or other data. The names of the directories correspond to the first four letters of the sample ID. All the samples are distributed to these directories according to their first four ID symbols.
Next to the bucket object is a "*.meta.json" file containing the "account_id" used when performing the request. If the bucket object is not a sample (for example, the bucket object is a JSON file in the "task-result" bucket), then the "Content-Type" will also be specified in this file.
An example of the folders structure in the "visionlabs-samples", "task-result" and "visionlabs-bodies-samples" buckets is given below.
./local_storage/visionlabs-samples/8f4f/
            8f4f0070-c464-460b-sf78-fac234df32e9.jpg
            8f4f0070-c464-460b-sf78-fac234df32e9.meta.json
            8f4f1253-d542-621b-9rf7-ha52111hm5s0.jpg
            8f4f1253-d542-621b-9rf7-ha52111hm5s0.meta.json
./local_storage/task-result/1b03/
            1b0359af-ecd8-4712-8fc0-08401612d39b
            1b0359af-ecd8-4712-8fc0-08401612d39b.meta.json
./local_storage/visionlabs-bodies-samples/6e98/
            6e987e9c-1c9c-4139-9ef4-4a78b8ab6eb6.jpg
            6e987e9c-1c9c-4139-9ef4-4a78b8ab6eb6.meta.json
A significant amount of memory may be required when storing a large number of samples. A single sample takes about 30 Kbytes of the disk space.
It is also recommended to create backups of the samples. Samples are utilized when the NN version is changed or when you need to recover your database of faces.
Use S3-compatible storage#
To enable the use of S3-compatible storage, you must perform the following steps:
- Make sure that the access key has sufficient authority to access the buckets of the S3-compatible storage.
- Launch the Image Store service (see "Image Store" section in the installation manual).
- Set the "S3" value for the "storage_type" setting of the Image Store service settings.
- Fill in the settings for connecting to an S3-compatible storage (host, Access Key and Secret Key, etc.) in the "S3" section of the Image Store service settings.
- Run the script for creating buckets
lis_bucket_create.py(see the "Create buckets" section in the installation manual).
If necessary, you can disable SSL certificate verification using the "verify_ssl" setting in the "S3" section of the Image Store service settings. This enables you to use a self-signed SSL certificate.
Object TTL#
You can set the object time to live (TTL) in buckets (both local and S3). Objects mean:
- Samples of faces or bodies.
- Images or objects created in the resources "/images" or "/objects".
- Source images.
- Task results.
TTL for objects is calculated relative to the GMT time format.
TTL for objects is set in days in the following ways:
- During the creation of a bucket for all objects at once (basic TTL bucket policy).
- After creating a bucket for specific objects using requests to the corresponding resources.
The number of days is selected from the list in the corresponding requests (see below).
In addition to the number of days, the parameter can take the value "-1", meaning that objects should be stored indefinitely.
Configuring basic TTL bucket policy#
The basic TTL bucket policy can be configured in the following ways:
- Using the
--bucket-ttlflag for thelis_bucket_create.pyscript. For example,python3 ./base_scripts/lis_bucket_create.py -ii --bucket-ttl=2. - Using a request to the Image Store service. For example,
curl -X POST http://127.0.0.1:5020/1/buckets?bucket=visionlabs-samples?ttl=2.
Configuring TTL for specific objects#
TTL for specific objects can be configured using the "ttl" parameter in the following places:
- In the "storage_policy" > "face_sample_policy", "body_sample_policy" and "image_origin_policy" handler policies.
- In the requests "create object", "create images" and "save sample".
- In the requests to create tasks or schedules in the "result_storage_policy" field.
If the "ttl" parameter is not specified, then the basic policy of the bucket in which the object is located (see above) will be applied.
Adding TTL to existing objects#
You can add a TLL to an existing object using PUT requests to the /objects, /images, /samples/{sample_type} resources of the Image Store service. It is not possible to add TTL of task results to already created and executed tasks. You can add TTL of task results to an already created schedule using the request "replace tasks schedule". For tasks created or running at the time of the request, the TTL of task results will not be applied.
You can add a TTL to an existing local bucket using a PUT request to the Image Store resource /buckets.
To add a TTL for a bucket located in S3, you need to perform a migration using the "base_scripts/migrate_ttl_settings" script from the Image Store service. This is because for TTL objects in S3 is applied via tag related filters. The command to perform S3 bucket migration is given in the installation manual. See "Migration to apply TTL to objects in S3" for details on S3 bucket migration.
Supported cloud providers#
Amazon S3 cloud providers, Yandex cloud storage and MinIO are supported.
Migration to apply TTL to objects in S3#
Lifecycle customization for S3 is applied through filters associated with tags (see official documentation). This assumes that objects have a tag with a limited set of values, and buckets have a set of rules based on the value of that tag.
To add tags and rules, you must perform a migration. Migration is strictly necessary to fully apply lifecycle customization for the following reasons:
- Buckets without rules will not delete objects, even if the user specifies a lifetime for a specific object.
- Objects without tags will never be deleted, even if the user specifies a lifetime for the bucket.
You need to add the following tags and rules:
- To support TTL for buckets, you need to add a
vl-expiretag with a default value for all existing objects. - To support TTL for specific objects, you need to add a set or TTL-related lifecycle rules for existing segments:
{
     "ID": "vl-expire-<ttl>",
     "Expiration": {
         "Days": <ttl>,
     },
     "Filter": {"Tag": {"Key": "vl-expire", "Value": <ttl>}},
     "Status": "Enabled",
}
A set of specific tag values associated with an object's TTL is supported: 1, 2, 3, 4, 5, 6, 7, 14, 30, 60, 90, 180, 365.
The migration process consists of two stages:
- Configuration of the bucket life cycle, expanded with a set of life cycle rules related to TTL.
- Assigning a
vl-expiretag to each object in the bucket, if it does not already have one.
Assigning a tag for each object can be skipped if necessary using the -update-tags=0 argument.
See the upgrade manual for example commands to perform the migration.
Permission issues
By default, all S3 resources, including buckets, objects, and lifecycle configuration, are private. If necessary, default rules and tags can be created manually by the resource owner using one of the applicable methods. See the official S3 documentation for details.
Useful links to official documentation:
- Creating a lifecycle configuration
- Put lifecycle configuration
- Managing object tags
- Expiring objects
Expiration of TTL#
When an object's TTL comes to an end, it is marked for deletion. For local buckets, the cleanup task is performed once a day (at 01:00 am). S3 buckets use internal ttl configuration rules. To prevent conflicts or duplication of cleanup tasks when multiple instances or worker processes are involved, a locking mechanism is implemented. This ensures that only one instance or worker process is responsible for performing the local storage cleanup process.
There may be a delay between the expiration date and the date the item is actually deleted. Both for local storage and S3.
Search for expiring objects#
To find out when an object expires, you can use queries with the HEAD methods on the /objects and /images resources. These requests return X-Luna-Expiry-Date response headers, which indicate the date on which the object is no longer eligible for persistence.
External samples#
You can send an external sample to Image Store. The external sample is received using third-party software or the VisionLabs software (e. g., FaceStream).
See the POST request on the "/samples/{sample_type}" resource in "APIReferenceManual.html" for details.
The external sample should correspond to certain standards so that LP could process it. Some of them are listed in the "Sample requirements" section.
The samples received using the VisionLabs software satisfy this requirement.
In case of third-party software, it is not guaranteed that the result of the external sample processing will be the same as for the VisionLabs sample. The sample can be of low quality (too dark, blurry and so on). Low quality leads to incorrect image processing results.
Anyway, it is recommended to consult VisionLabs before using external samples.
Accounts service#
The Accounts service is intended for:
- Creation, management and storage of accounts.
- Creation, management and storage of tokens and their permissions.
- Verification of accounts and tokens.
See "Accounts, tokens and authorization types" section for more information about the authorization system in LUNA PLATFORM 5.
All created accounts, tokens and their permissions are saved in the Accounts service database.
JWT Tokens algorithms#
The JWT (JSON Web Tokens) authentication mechanism supports various algorithms for token signing. This section describes the default algorithm used and the necessary steps to use an alternative algorithm.
Default algorithm#
By default, the service uses the HS256 algorithm to sign JWT tokens. If you want to use asymmetric cryptographic encryption, you can use the ES256 algorithm.
Use ES256 algorithm#
To use the ES256 algorithm, follow these steps:
-
Generate a private ECDSA key.
First, you need to generate a private ECDSA key using the
prime256v1curve. This can be done using command-line tools such as OpenSSL.Example command:
openssl ecparam -genkey -name prime256v1 -out ec_private.pemYou can also generate a key protected by a password, for example:
openssl ecparam -genkey -name prime256v1 | openssl ec -aes256 -out ec_private_enc.pem -
Encode the private key in Base64.
After generating the private key, encode it in Base64 format. This can be achieved with tools available in most operating systems.
Example command:
base64 -w0 ecdsa_private.pem > ecdsa_private_base64 -
Set the environment variable.
The encoded private key must be specified in the
ACCOUNTS_JWT_ECDSA_KEYenvironment variable when starting the container. This allows the service to use the key for signing JWT tokens with the ES256 algorithm.Additionally, if your private key is protected with a password, you can specify the password in the
ACCOUNTS_JWT_ECDSA_KEY_PASSWORDenvironment variable.Example container run command with environment variables:
docker run \
--env=CONFIGURATOR_HOST=127.0.0.1 \
--env=ACCOUNTS_JWT_ECDSA_KEY=jwt_ecdsa_key \
--env=ACCOUNTS_JWT_ECDSA_KEY_PASSWORD=ecdsa_key_password \
...
By following these steps, the service will be able to sign JWT tokens using the ES256 algorithm, providing enhanced security through asymmetric cryptography.
Impact of changing algorithm type#
Switching the signing algorithm from HS256 to ES256 (or vice versa) has a significant impact on token validation. All existing tokens signed with the previous algorithm will become invalid after the changes are made. This happens because the token signature verification mechanism expects the structure and cryptographic base of the token to match the newly specified algorithm.
Faces service#
Faces service is used for:
- Creating temporary attributes.
- Creating faces.
- Creating lists.
- Attaching faces to lists.
- Managing of the general database that stores faces with the attached data and lists.
- Receive information about the existing faces and lists.
Matching services#
Python Matcher has the following features:
- Matching according to the specified filters. This matching is performed directly on the Faces or the Events database. Matching by DB is beneficial when several filters are set.
- Matching by lists. In this case, it is recommended that descriptors are save in the Python Matcher cache.
Python Matcher Proxy is used to route requests to Python Matcher services and matching plugins.
Python Matcher#
Python Matcher utilizes Faces DB for filtration and matching when faces are set as candidates for matching and filters for them are specified. This feature is always enabled for Python Matcher.
Python Matcher utilizes Events DB for filtration and matching when events are set as candidates for matching and filters for them are specified. The matching using the Events DB is optional, and it is not used when the Events service is not utilized.
A VLMatch matching function is required for matching by DB. It should be registered for the Faces DB and the Events DB. The function utilizes a library that should be compiled for your current DB version. You can find information about it in the installation manual in "VLMatch library compilation", "Create VLMatch function for Faces DB", and "Create VLMatch function for Events DB" sections.
Python Matcher service additionally uses workers that process requests.
Python Matcher Proxy#
The API service sends requests to the Python Matcher Proxy if it is configured in the API configuration. Then the Python Matcher Proxy service redirects requests to the Python Matcher service or to matching plugins (if they are used).
If the matching plugins are not used, then the service route requests only to the Python Matcher service. Thus, you don't need to use Python Matcher Proxy unless you intend to use matching plugins. See the "Matching plugins" section for a description of how the matching plugins work.
List caching#
When faces are specified as candidates for matching and list IDs for them are specified as filters, Python Matcher performs a matching by lists.
By default, when the Python Matcher service is launched, all descriptors in all lists are cached in its memory.
Caching is managed by the "DESCRIPTORS_CACHE" section.
The Python Matcher service will not start until it loads all available descriptors into the cache.
When executing a list matching request, the Python Matcher service automatically adds it to the queue, from where it is picked up by the worker and sent to the Cached Matcher entity to perform a matching on cached data.
After performing the matching, the worker takes the results and returns them to the Python Matcher service and the user.
This caching enabling you to significantly increase the performance of the matching.
If necessary, you can process only specific lists using the parameter "cached_data > faces_lists > include" or exclude lists using the parameter "cached_data > faces_lists > exclude". The latter is especially useful when working with the LUNA Index Module to implement the logic of processing parts of lists using Python Matcher, and parts using LIM Indexed Matcher.
For more information about LIM, see "Matching a large set of descriptors".
Workers cache#
When multiple workers are launched for the Python Matcher service, each of the workers uses the same descriptors cache.
This change can both speed up and slow down the service. If you need to ensure that the cache is stored in each of the Python Matcher workers, you should run each of the server instances separately.
Events service#
The Events service is used for:
- Storage of all the created events in the Events database.
- Returning all the events that satisfy filters.
- Gathering statistics on all the existing events according to the specified aggregation and frequency/period.
- Storage of descriptors created for events.
As the event is a report, you can't modify already existing events.
The Events service should be enabled in the API service configuration file. Otherwise, events will not be saved to the database.
Database for Events#
PostgreSQL is used as a database for the Events service.
The speed of request processing is primarily affected by:
- The number of events in the database.
- Lack of indexes for PostgreSQL.
PostgreSQL shows acceptable requests processing speed with the number of events from 1 000 000 to 10 000 000. If the number of events exceeds 10 000 000, the request to PostgreSQL may fail.
The speed of the statistics requests processing in the PostgreSQL database can be increased by configuring the database and creating indexes.
Geo position#
You can add a geo position during event creation.
The geo position is represented as a JSON with GPS coordinates of the geographical point:
- "longitude" — Geographical longitude in degrees.
- "latitude" — Geographical latitude in degrees.
The geo position is specified in the "location" body parameter of the event creation request. See the "Create new events" section of the Events service reference manual.
You can use the geo position filter to receive all the events that occurred in the required area.
Geo position filter#
A geo position filter is a bounding box specified by coordinates of its center (origin) and some delta.
It is specified using the following parameters:
- "origin_longitude"
- "origin_latitude"
- "longitude_delta"
- "latitude_delta"
The geo position filter can be used when you get events, get statistics on events, and perform events matching.
Geo position filter is considered as properly specified if:
- both "origin_longitude" and "origin_latitude" are set.
- neither "origin_longitude", "origin_latitude", "longitude_delta", or "latitude_delta" is set.
If both "origin_longitude" and "origin_latitude" are set and "longitude_delta" is not set — the default value is applied (see the default value in the OpenAPI documentation).
Read the following recommendations before using geo position filters.
The general recommendations and restrictions for geo position filters are:
- Do not create filters with a vertex or a border on the International Date Line (IDL), the North Pole or the South Pole. They are not fully supported due to the features of database spatial index. The filtering result may be unpredictable.
- Geo position filters with edges more than 180 degrees long are not allowed.
- It is highly recommended to use the geo position filter citywide only. If a larger area is specified, the filtration results on the borders of the area can be unexpected due to the spatial features.
- Avoid creating a filter that is too extended along longitude or latitude. It is recommended to set the values of deltas close to each other.
The last two recommendations exist due to the spatial features of the filter. According to these features, when one or two deltas are set to large values, the result may differ from the expected though it will be correct. See the "Filter features" section for details.
Filter performance#
Geo position filter performance depends on the spatial data type used to store event geo position in the database.
Two spatial data types are supported:
- GEOMETRY. Spatial object with coordinates expressed as (longitude, latitude) pairs, defined in the Cartesian plane. All calculations use Cartesian coordinates.
- GEOGRAPHY. Spatial object with coordinates expressed as (longitude, latitude) pairs, defined as on the surface of a perfect sphere, or a spatial object in the WGS84 coordinate system.
For a detailed description, see geometry vs geography.
Geo position filter is based on the ST_Covers PostGIS function supported for both Geometry and Geography type.
Filter features#
Geo position filter has some features caused by PostGIS.
When geography type is used and the geo position filter covers a wide portion of the planet surface, filter result may be unexpected but geographically correct due to some spatial features.
The following example illustrates this case.
An event with the following geo position was added in the database:
{
    "longitude": 16.79,
    "latitude": 64.92,
}
We apply a geo position filter and try to find the required point on the map. The filter is too extended along the longitude:
{
    "origin_longitude": 16.79,
    "origin_latitude": 64.92,
    "longitude_delta": 2,
    "latitude_delta": 0.01,
}
This filter will not return the expected event. The event will be filtered due to spatial features. Here is the illustration showing that the point is outside the filter.

You should consider this feature to create a correct filter.
For details, see Geography.
Events creation#
Events are created using handlers. Handlers are stored in the Handlers database. You should specify the required handler ID in the event creation request. All the data stored in the event will be received according to the handler parameters.
You should perform two separate requests for event creation.
The first request creates a handler. Handler includes policies that describes how the image is processed hence defining the LP services used for the processing.
The second request creates new events using the existing handler. An event is created for each image that has been processed.
You can specify the following additional data for each event creation request:
- external ID (for created faces)
- user data (for created faces)
- source (for created events)
- tags (for created events)
The handler is processed policy after policy. All the data from the request is processed by a policy before going to the next policy. The "detect" policy is performed for all the images from the request, then "multiface" policy is applied, then the "extract" policy is performed for all the received samples, etc. For more information about handlers, see the "Handlers description" section.
Events meta-information#
If any additional data needs to be stored along with the event, the "meta" field should be used. The "meta" field stores data in the JSON format. The total size of the data stored in the "meta" field for one event cannot exceed 2 MB. It is assumed that with the help of this functionality, the user will create his own data model (event structure) and will use it to store the necessary data.
Note that you cannot specify field names with spaces in the "meta" field.
Data in the "meta" field can be set in the following ways:
- In the "generate events" request body with the content type
application/jsonormultipart/form-data. - In the "save event" request body.
- Using a custom plugin or client application.
In the "generate events" request body, it is possible to set the "meta" field both for specific images and for all images at once (mutual meta-information). For requests with aggregation enabled, only mutual meta-information will be used for the aggregated event, and meta-information for specific images will be ignored. See the detailed information in the "generate events" request body in the OpenAPI specification.
Example of recording the "meta" field:
{
    "meta": {
        "user_info": {
            "temperature": 36.6
        }
    }
}
In order to store multiple structures, it is necessary to explicitly separate them to avoid overlapping fields. For example, as follows:
{
    "struct1": {
        ...
    },
    "struct2": {
        ...
    }
}
Search by "meta" field#
You can get the contents of the "meta" field using the appropriate filter in the "get events" request.
The filter should be entered using a specific syntax — meta.<path.to.field>__<operator>:<type>, where:
meta.— An indication that the "meta" field of the Events database is being accessed.<path.to.field>— Path to the object. A dot (.) is used to navigate nested objects. For example, in the string{"user_info":{"temperature":"36.6"}}to refer to thetemperatureobject, use the following filtermeta.user_info.temperature.__<operator>— One of the following operators —eq(default),neq,like,nlike,in,nin,gt,gte,lt,lte. For example,meta.user_info.temperature__gte;:type— one of the following data types —string,integer,numeric. For example,meta.user_info.temperature__gte:numeric.
For each operator, the use of certain data types is available. See the table of operator dependency on data types in the OpenAPI specification.
If necessary, you can build an index to improve the search. See the Events developer manual for details on building an index.
Important notes#
When working with the "meta" field, remember the following:
- you need to keep data consistent with given schemes; in case of a mismatch, PostgreSQL will not allow inserting a row with a type that cannot be added to the existing index (if any);
- if necessary, you can migrate data;
- if necessary, you can build an index;
- specify the data type when performing a request (by default, all values are assumed to be strings);
- you need to pay attention to the names of the fields; fields to be filtered by must not contain reserved keywords like
:int, double underscores, special symbols, and so on.
Sender service#
The Sender service is an additional service that is used to send events via web sockets. This service communicates with the Handlers service (in which events are created) through the pub/sub mechanism via the Redis DB channel.
If necessary, you can send notifications over the HTTP protocol. See the "Send events to third-party service" section for more details.
Events are created based on handlers. To receive notifications, the "callbacks" policy with "luna-ws-notification" must be enabled. This policy has filters that enable you to send notifications only under certain conditions, for example, to send only if the candidate is very similar to the reference (the "similarity__lte" parameter).
In previous versions of LUNA PLATFORM, the "notification_policy" was used. It is now considered deprecated and is not recommended for use. The main advantage of the callback mechanism over the deprecated "notification_policy" is the ability to specify multiple callbacks with different filters in the handler creation request, resulting in only one event being sent.
You should configure web sockets connection using special request. It is recommended create web sockets connection using the "/ws" resource of the API service. You can specify filters (query parameters) in the request, i.e. you can configure the Sender service to receive only certain events. See OpenAPI specification for detailed information about the configuration of creating a connection to a web socket.
Configuring web sockets directly via Sender is also available (see "/ws" of the Sender service). It can be used to reduce the load on the API service.
When an event is created it can be:
-
Saved to the Events database. The Events service should be enabled to save an event.
-
Returned in the response without saving to the database.
In both cases, the event is sent via the Redis DB channel to the Sender service.
In this case, the Redis DB acts as a connection between Sender and Handlers services and does not store transferred events.
The Sender service is independent of the Events service. Events can be sent to Sender even if the Events service is disabled.
Creating handlers and specifying filters for sending notifications
- The user sends the "create handler" request to the API service, where it enables the "callbacks" and sets filters according to which events will be sent to the Sender service.
- The API service sends a request to the Handlers service.
- The Handlers service sends a response to the API service.
- The API service sends the "handler_id" to the user.
The user saves the ID "handler_id", which is necessary for creating events.
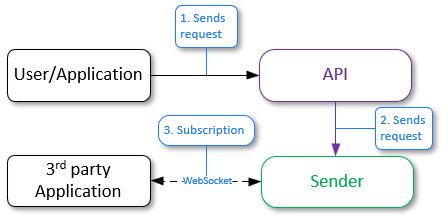
Activation of subscription to events and filtering of their sending
- The user or application sends a request "ws handshake" to the API service and sets filters through which it will be possible to filter the received data from the Handlers service.
- The API service sends a request to the Sender service.
- The Sender service establishes a connection via web sockets with the user application.
Now, when an event is generated, it will be automatically redirected to the Sender service (see below) in accordance with the specified filters.

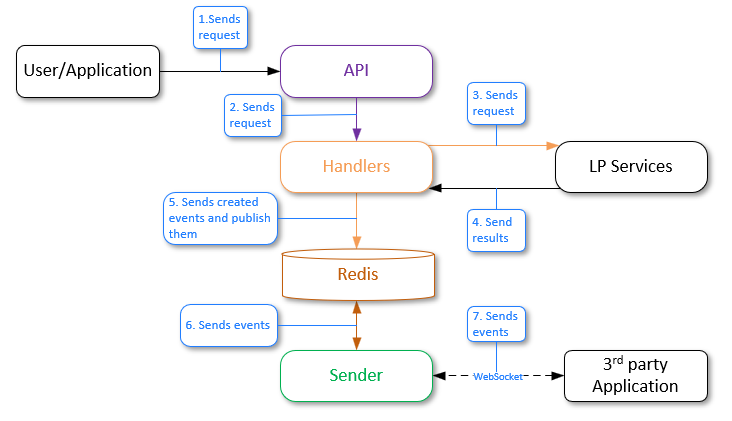
Event generation and sending to Sender
The general workflow is as follows:
- A user or an application sends the "generate events" request to the API service.
- The API service sends the request to the Handlers service.
- The Handlers service sends requests to the corresponding LP services.
- LP services process the requests and send results. New events are created.
- The Handlers service sends an event to the Redis database using the pub/sub model. Redis has a channel to which the Sender service is subscribed, and it is waiting for messages to be received from this channel.
- Redis sends the received events to Sender by the channel.
- Third-party party applications should be subscribed to the Sender service via web sockets to receive events. If there is a subscribed third-party party application, Sender sends events to it according to the specified filters.
See the OpenAPI documentation for information about the JSON structure returned by the Sender service.
Tasks service#
The Tasks service is used for long tasks processing.
General information about tasks#
As tasks processing takes time, the task ID is returned in the response to the task creation.
After the task processing is finished, you can receive the task results using the "task " > "get task result" request. You should specify the task ID to receive its results.
You can find the examples of tasks processing results in the response section of "task " > "get task result" request. You should select the task type in the Response samples section of documentation.
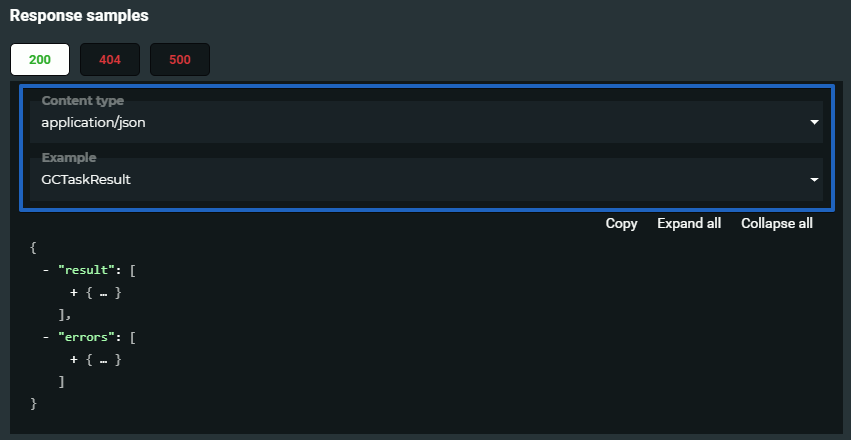
You should make sure that the task was finished before requesting its results:
- You can check the task status by specifying the task ID in the "tasks" > "get task" request. There are the following task statuses:
| Tasks status | Value |
|---|---|
| pending | 0 |
| in progress | 1 |
| cancelled | 2 |
| failed | 3 |
| collect results | 4 |
| done | 5 |
- You can receive information about all the tasks using the "tasks" > "get tasks" request. You can set filter to receive information about tasks of interest only.
Clustering task#
As the result of the task a cluster with objects selected according to the specified filters for faces or events is created. Objects corresponding to all of the filters will be added to the cluster. Available filters depend on the object type: events or faces.
You can receive the task status or result using additional requests (see the "General information about tasks").
You can use the reporter task to receive the report about objects added to clusters.
Clustering is performed in several steps:
-
Objects with descriptors are collected according to provided filters
-
Every object is matched with all the other objects
-
Create clusters as groups of "connected components" from the similarity graph.
Here "connected" means that similarity is greater than provided threshold or default "DEFAULT_CLUSTERING_THRESHOLD" from the config.
- If needed, download existing images corresponding to each object: avatar for a face, first sample for an event.
As a result of the task an array of clusters is returned. A cluster includes IDs of objects (faces or events) whose similarity is greater then the specified threshold. You can use the information for further data analysis.
{
    "errors": [],
    "result": {
        "clusters": [
            [
                "6c721b90-f5a0-409a-ab70-bc339a70184c"
            ],
            [
                "8bc6e8df-410b-4065-b592-abc5f0432a1c"
            ],
            [
                "e4e3fc66-53b4-448c-9c88-f430c00cb7ea"
            ],
            [
                "02a3a1c4-93d7-4b69-99ec-21d5ef23852e",
                "144244cb-e10e-478c-bdac-18cd2eb27ee6",
                "1f4cdbcb-7b1e-40cc-873b-3ff7fa6a6cf0"
            ]
        ],
        "total_objects": 6,
        "total_clusters": 4
    }
}
The clustering task result can also include information about errors occurred during the objects processing.
For such a task, you can create a schedule.
Reporter task#
As a result of the task, the report on the clustering task is created. You can select data that should be added to the report. The report has CSV format.
You can receive the task status or result using additional requests (see the "General information about tasks").
You should specify the clustering task ID and the columns that should be added to the report. The selected columns correspond to the general events and faces fields.
Make sure that the selected columns correspond to the objects selected in the clustering task.
You can also receive the images for all the objects in clusters if they are available.
Exporter task#
The task enables you to collect event and/or face data and export them from LP to a CSV file. The file rows represent requested objects and corresponding samples (if they were requested).
This task uses memory when collecting data. So, its possible that Tasks Worker will be killed by OOM (Out-Of-Memory) killer if you request a lot of data.
You can export event or face data using the "/tasks/exporter" request. You should specify what type of object is required by setting objects_type parameter when creating a request. You can also narrow your request by providing filters for faces and events objects. See the "exporter task" request in the API service reference manual.
As a result of the task a zip archive containing a CSV file is returned.
You can receive the task status or result using additional requests (see the "General information about tasks").
When executing the Exporter task with a large number of faces in the Faces database (for example, 90,000,000 faces), the execution time of requests to the Faces service can be significantly increased. To speed up request execution, you can set the PostgreSQL setting "parallel_setup_cost" to
500. However, be aware that changing this setting may have other consequences, so you should be careful when changing the setting.For such a task, you can create a schedule.
Cross-matching task#
When the task is performed, all the references are matched with all the candidates. References and candidates are set using filters for faces and events.
Matching is performed only for objects that contain extracted descriptors.
You can specify the maximum number of matching candidates returned for every match using the limit field.
You can set a threshold to specify the minimal acceptable value of similarity. If the similarity of two descriptors is lower then the specified value, the matching result will be ignored and not returned in the response. References without matches with any candidates are also ignored.
Cross-matching is performed in several steps:
- collect objects having descriptors using provided filters
- match every reference object with every candidate object
- match results are sorted (lexicographically) and cropped (limit and threshold are applied)
You can receive the task status or results using additional requests (see the "General information about tasks").
As a result an array is returned. Each element of the array includes a reference and top similar candidates for it. Information about errors occurred during the task execution is also returned in the response.
{
"result": [
    {
        "reference_id": "e99d42df-6859-4ab7-98d4-dafd18f47f30",
        "candidates": [
            {
                "candidate_id": "93de0ea1-0d21-4b67-8f3f-d871c159b740",
                "similarity": 0.548252
            },
            {
                "candidate_id": "54860fc6-c726-4521-9c7f-3fa354983e02",
                "similarity": 0.62344
            }
        ]
    },
    {
        "reference_id": "345af6e3-625b-4f09-a54c-3be4c834780d",
        "candidates": [
            {
                "candidate_id": "6ade1494-1138-49ac-bfd3-29e9f5027240",
                "similarity": 0.7123213
            },
            {
                "candidate_id": "e0e3c474-9099-4fad-ac61-d892cd6688bf",
                "similarity": 0.9543
            }
        ]
    }
],
"errors": [
    {
        "error_id": 10,
        "task_id": 123,
        "subtask_id": 5,
        "error_code": 0,
        "description": "Faces not found",
        "detail": "One or more faces not found, including face with id '8f4f0070-c464-460b-bf78-fac225df72e9'",
        "additional_info": "8f4f0070-c464-460b-bf78-fac225df72e9",
        "error_time": "2018-08-11T09:11:41.674Z"
    }
]
}
For such a task, you can create a schedule.
Linker task#
The task enables you to attach faces to lists according to the specified filters.
You can specify creation of a new list or specify the already existing list in the requests.
You can specify filters for faces or events to perform the task. When an event is specified for linking to list a new face is created based on the event.
If the create_time_lt filter is not specified, it will be set to the current time.
As the result of the task you receive IDs of faces linked to the list.
You can receive the task status or result using additional requests (see the "General information about tasks").
Task execution process for faces:
- A list is created (if create_list parameter is set to 1) or the specified
list_idexistence is checked. - Face ID boundaries are received. Then one or several subtasks are created with about 1000 face ids per each. The number depends on face ID spreading.
-
For each subtask:
- Face IDs are received. They are specified for the current subtask by filters in the subtask content.
- The request is sent to the Luna Faces to link specified faces to the specified list.
- The result for each subtask is saved to the Image Store service.
-
After the last subtask is finished, the worker collects results of all the subtasks, merges them and puts them to the Image Store service (as task result).
Task execution process for events:
- A list is created (if create_list parameter is set to 1) or the specified
list_idexistence is checked. - Events page numbers are received. Then one or several subtasks are created.
-
For each subtask:
- Event with their descriptors are received from the Events service.
- Faces are created using the Faces service. Attribute(s) and sample(s) are added to the faces.
- The request is sent to the Luna Faces to link specified faces to the specified list.
- The result for each subtask is saved to the Image Store service.
-
After the last subtask is finished, the worker collects results of all the subtasks, merges them and puts them to the Image Store service (as task result).
For such a task, you can create a schedule.
Garbage collection task#
During the task processing, faces, events or descriptors can be deleted.
- When descriptors are set as a GC target, you should specify the descriptor version. All the descriptors of the specified version will be deleted.
- When events are set as a GC target, you should specify one or several of the following parameters:
- Account ID.
- Upper excluded boundary of event creation time.
- Upper excluded boundary of the event appearance in the video stream.
- Handler ID used for the event creation.
- When faces are set as a GC target, you should specify one or several of the following parameters:
- Upper excluded boundary of face creation time.
- Lower included boundary of face creation time.
- User data.
- List ID.
If necessary, you can delete samples along with faces or events. You can also delete image origins for events.
Garbage collection task with faces or events set as the target can be processed using the API service API, while the Admin or Task services API can be used to set faces, events and descriptors as the target. Thus the specified objects will be deleted for all the existing accounts.
You can receive the task status or result using additional requests (see the "General information about tasks").
For such a task, you can create a schedule.
Additional extraction task#
The Additional extraction task re-extracts descriptors extracted using the previous neural network model using a new version of the neural network. This enables you to save previously used descriptors when updating the neural network model. If there is no need to use the old descriptors, then you can not perform this task and only update the neural network model in the Configurator settings.
This section describes how to work with the Additional extraction task. See detailed information about neural networks, the process of updating a neural network to a new model and relevant examples in the "Neural networks" section.
Re-extraction can be performed for face and event objects. You can re-extract the descriptors of faces, descriptors of bodies (for events) or basic attributes if they were not extracted earlier.
The samples for descriptors should be stored for the task execution. If any descriptors do not have source samples, they cannot be updated to a new NN version.
The re-extraction tasks are used for the update to a new neural network for descriptors extraction. All the descriptors of the previous version will be re-extracted using a new NN.
It is highly recommended not to perform any requests changing the state of databases during the descriptor version updates. It can lead to data loss.
Create backups of LP databases and the Image Store storage before launching the additional extraction task.
When processing the task, a new neural network descriptor is extracted for each object (face or event) whose descriptor version matches the version specified in the "DEFAULT_FACE_DESCRIPTOR_VERSION" (for faces) or "DEFAULT_HUMAN_DESCRIPTOR_VERSION" (for bodies) settings. Descriptors whose version does not match the version specified in these settings are not re-extracted. They can be removed using the Garbage collection task.
Request to the Admin service
You need to make a request to the "additional_extract" resource, specifying the following parameters in the request body:
- "content" > "extraction_target" – Face descriptors, body descriptors, basic attributes.
- "content" > "options" > "descriptor_version" – New neural network version (not applicable for basic attributes).
- "content" > "filters" > "object_type" – Faces or events.
If necessary, you can additionally filter the object type by "account_id", "face_id__lt", etc.
See the "create additional extract task" request in the Admin service OpenAPI specification for more information.
You can receive the task status or result using additional requests (see the "General information about tasks").
Admin user interface
You need to do the following:
-
Go to the Admin user interface:
http://<admin_server_ip>:5010/tasks. -
Run the additional extraction task using the corresponding button.
-
In the window that appears, set the object type (face or event), the extraction type (face descriptor, body descriptor or basic attributes), new neural network model (not applicable for basic attributes) and click "Start", confirming the start of the task.
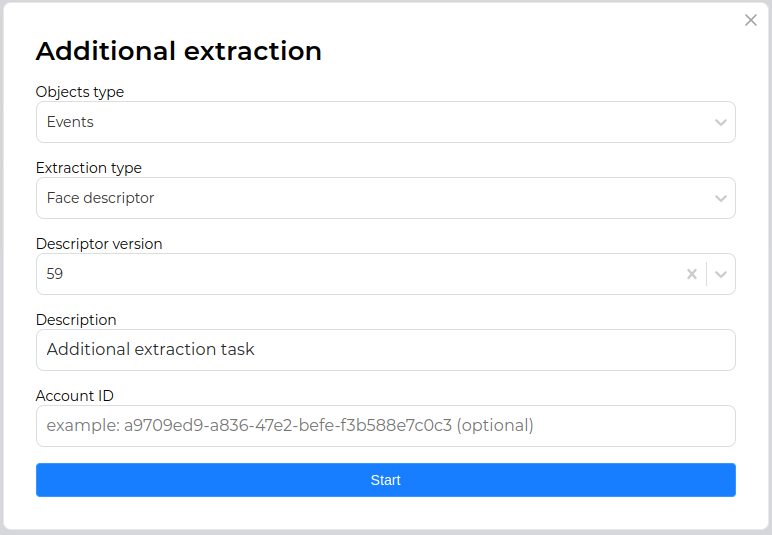
If necessary, you can additionally filter the object type by "account_id".
See the detailed information about the Admin user interface in the "Admin user interface" section.
For such a task, you can create a schedule.
ROC-curve calculating task#
As a result of the task, the Receiver Operating Characteristic curve with TPR (True Positive Rate) against the FPR (False Positive Rate) is created.
See additional information about ROC-curve creation in "TasksDevelopmentManual".
ROC calculation task
ROC (or Receiver Operating Characteristic) is a performance measurement for classification tasks at various thresholds settings. The ROC-curve is plotted with TPR (True Positive Rate) against the FPR (False Positive Rate). TPR is a true positive match pair count divided by a count of total expected positive match pairs, and FPR is a false positive match pair count divided by a count of total expected negative match pairs. Each point (FPR, TPR) of the ROC-cure corresponds to a certain similarity threshold. See more at wiki.
Using ROC the model performance is determined by looking at:
- Area under the ROC-curve (or AUC).
- Type I and type II error rates equal point, i.e. the ROC-curve and the secondary main diagonal intersection point.
The model performance also determined by hit into the top-N probability, i.e. probability of hit a positive match pair into the top-N for any match result group sorted by similarity.
It requires "markup" to make a ROC task. One can optionally specify "threshold_hit_top" (default 0) to calculate hit into the top-N probability, the match "limit" (default 5), "key_FPRs" — list of key FPR values to calculate ROC-curve key points, and "filters" with "account_id". Also, it needs "account_id" for task creation.
You can receive the task status or result using additional requests (see the "General information about tasks").
Markup
Markup is expected in the following format:
[{'face_id': <face_id>, 'label': <label>}]
Label (or group id) can be a number or any string.
Example:
[{'face_id': '94ae2c69-277a-4e46-817d-543f7d3446e2', 'label': 0},
 {'face_id': 'cd6b52be-cdc1-40a8-938b-a97a1f77d196', 'label': 1},
 {'face_id': 'cb9bda07-8e95-4d71-98ee-5905a36ec74a', 'label': 2},
 {'face_id': '4e5e32bb-113d-4c22-ac7f-8f6b48736378', 'label': 3},
 {'face_id': 'c43c0c0f-1368-41c0-b51c-f78a96672900', 'label': 2}]
For such a task, you can create a schedule.
Estimator task#
The estimator task enables you to perform batch processing of images using the specified policies.
As a result of the task performing, JSON is returned with data for each of the processed images and information about the errors that have occurred.
In the request body, you can specify the handler_id of an already existing static or dynamic handler. For the dynamic handler_id, the ability to set the required policies is available. In addition, you can create a static handler specifying policies in the request.
The resource can accept five types of sources with images for processing:
- ZIP archive
- S3-like storage
- Network disk
- FTP server
- Samba network file system
To obtain correct results of image processing using the Estimator task, all processed images should be either in the source format or in the format of samples. The type of transferred images is specified in the request in the "image_type" parameter.
For such a task, you can create a schedule. When creating a schedule, it is not possible to specify a ZIP archive as an image source.
ZIP archive as image source of estimator task
The resource accepts for processing a link to a ZIP archive with images. The size of the archive is set using the "ARCHIVE_MAX_SIZE" parameter in the "config.py" configuration file of the Tasks service. The default size is 100 GB. An external URL or the URL to an archive saved in the Image Store can be used as a link to the archive. In the second case, the archive should first be saved to the LP using a POST request to the "/objects" resource.
When using an external URL, the ZIP archive is first downloaded to the Tasks Worker container storage, where the images are unpacked and processed. After the end of the task, the archive is deleted from the repository along with the unpacked images.
It is necessary to take into account the availability of free space for the above actions.
The archive can be password protected. The password can be passed in the request using the "authorization" -> "password" parameter.
S3-like storage as image source of estimator task
The following parameters can be set for this type of source:
- "bucket_name" — Bucket name/Access Point ARN/Outpost ARN (required).
- "endpoint" — Storage endpoint (only when specifying the bucket name).
- "region" — Bucket region (only when specifying the bucket name).
- "prefix" — File key prefix. It can also be used to load images from a specific folder, such as "2022/January".
The following parameters are used to configure authorization:
- Public access key (required)
- Secret access key (required)
- Authorization signature version ("s3v2"/"s3v4")
It is also possible to recursively download images from nested bucket folders and save original images.
For more information about working with S3-like repositories, see AWS User Guide.
Network disk as image source of estimator task
The following parameters can be set for this type of source:
- "path" — Absolute path to the directory with images in the container (required).
- "follow_links" — Enables/disables symbolic link processing.
- "prefix" — File key prefix.
- "postfix" — File key postfix.
See an example of using prefixes and postfixes in the "/tasks/estimator" resource description.
When using a network disk as an image source and launching Tasks and Tasks Worker services through Docker containers, it is necessary to mount the directory with images from the network disk to the local directory and synchronize it with the specified directory in the container. You can mount a directory from a network disk in any convenient way. After that, you can synchronize the mounted directory with the directory in the container using the following command when launching the Tasks and Tasks Worker services:
docker run \
...
-v /var/lib/luna/current/images:/srv/images
...
Here:
/var/lib/luna/current/images— Path to the previously mounted directory with images from the network disk./srv/images- Path to the directory with the images in the container where they will be moved from the network disk. This path should be specified in the request body of the Estimator task (the "path" parameter).
As for S3-like storage, the ability to recursively download images from nested bucket folders is available.
FTP server as image source of estimator task
For this type of source, the following parameters can be set in the request body for connecting to the FTP server:
- "host" — FTP server IP address or hostname (required).
- "port" — FTP server port.
- "max_sessions" — Maximum number of allowed sessions on the FTP server.
- "user", "password" — Authorization parameters (required).
As in Estimator tasks using S3-like storage or network disk as image sources, it is possible to set the path to the directory with images, recursively receive images from nested directories, select the type of transferred images, and specify the prefix and postfix.
See an example of using prefixes and postfixes in the "/tasks/estimator" resource description.
Samba as image source of estimator task
For this type of source, the parameters are similar to those of an FTP server, except for the "max_sessions" parameter. Also, if authorization data is not specified, the connection to Samba will be performed as a guest.
Task processing#
The Tasks service includes the Tasks service and Tasks workers. Tasks receives requests to the Tasks service, creates tasks in the DB and sends subtasks to Tasks workers. The workers are implemented as a separate Tasks Worker container. Tasks workers receive subtasks and perform all the required requests to other services to solve the subtasks.
The general approach for working with tasks is listed below.
- User sends the request for creation of a new task.
- Tasks service creates a new task and sends subtasks to workers.
- Tasks workers process subtasks and create reports.
- If several workers have processed subtasks and have created several reports, the worker, which finished the last subtask, gathers all the reports and creates a single report.
- When the task is finished, the last worker updated its status in the Tasks database.
- User can send requests to receive information about tasks and subtasks and number of active tasks. The user can cancel or delete tasks.
- User can receive information about errors that occurred during execution of the tasks.
- After the task is finished the user can send a request to receive results of the task.
See the "Tasks diagrams" section for details about tasks processing.
Running scheduled tasks#
In LUNA PLATFORM, it is possible to set a schedule for Garbage collection, Clusterization, Exporter, Linker, Estimator, Additional extract, Cross-matching and Roc-curve calculating tasks.
To use a filter relative to the current time ("now-time"), the current time will be counted not from the creation of the schedule, but from the creation of the task by the schedule in accordance with the cron expression. See "Now-time filters" for details.
The schedule is created using the request "create tasks schedule" to the API service, which specifies the contents of the task being created and the time interval for its launch. To specify the time interval, Cron expressions are used.
Cron expressions are used to determine the task execution schedule. They consist of five fields separated by spaces. Each field defines a specific time interval in which the task should be completed. The week number starts from Sunday.
For tasks that can only be performed using the Admin service (for example, the task of removing some objects using the GC task), you can assign a schedule only in the Admin service.
In response to the request, a "schedule_id" is issued, which can be used to get information about the status of the task, the time of the next task, etc. (requests "get tasks schedule and "get tasks schedules). The id and all additional information are stored in the "schedule" table of the Tasks database.
If necessary, you can create a delayed schedule, and then activate it using the "action" = "start" parameter of the "patch tasks schedule" request. Similarly, you can stop the scheduled task using "action" = "stop". To delete a schedule, you can use the "delete tasks schedule" request.
Permissions to work with schedules are specified in the token with the "task" permission. This means that if the user has permission to work with tasks, then he will also be able to use the schedule.
The possibility of schedule creation is also available for Lambda tasks.
Examples of Cron expressions#
This section describes various examples of Cron expressions.
- Run the task every day at 3 a.m.:
0 3 * * *
- Run the task every Friday at 18:30:
30 18 * * 5
- Run the task every first day of the month at noon:
0 12 1 * *
- Run the task every 15 minutes:
*/15 * * * *
- Run the task every morning at 8:00, except weekends (Saturday and Sunday):
0 8 * * 1-5
- Run the task at 9:00 am on the first and 15th day of each month, but only if it is Monday:
0 9 1,15 * 1
Send notification about task and subtask status changes#
If necessary, you can send notifications about changes in task and subtask status using the callback mechanism. Callbacks allow you to send data to a third-party system at a specified URL or to Telegram. To configure notifications, you need to configure the "notification_policy" in the request parameters of the corresponding task.
You can also configure sending notifications for tasks and subtask in the schedule settings.
If necessary, you can obtain information about the current state of the notification policy or change some policy data using "get task notification policy" and "replace task notification policy" requests.
Additional protection for passwords and tokens#
Passwords and tokens passed in Estimator task and in "notification_policy" can be additionally encrypted. To do this, pass custom values to the FERNET_PASSPHRASE and SALT environment variables when starting the Tasks service container.
FERNET_PASSPHRASE is the password or key used to encrypt data using the Fernet algorithm.
SALT is a random string added to the password before it is hashed.
Fernet is a symmetric encryption algorithm that provides authentication and data integrity as well as confidentiality. With this algorithm, the same key is used to encrypt and decrypt data.
Salt is added to make it more difficult to crack the password by brute force. Each time a password is hashed, a unique string is used, making identical passwords hashed differently. This increases the security of the system, especially if users have the same passwords.
Example of a container startup command passing environment variables:
docker run \
--env=CONFIGURATOR_HOST=127.0.0.1 \
--env=FERNET_PASSPHRASE=security_passphrase.
--env=SALT=salt_for_passwords_and_tokens.
...
Important: When the container is started with the above environment variables specified, the old passwords and tokens will no longer work. Additional migration steps must be performed (see section below).
Add encryption when updating#
In order to add additional protection for already existing passwords and tokens, you need to specify environment variables in the Tasks database migration command (see above). After that, you should start a new Tasks container with environment variables specified to enable the use of encryption when creating new objects.
Admin service#
The Admin service is used to perform general administrative routines:
- Manage user accounts.
- Receive information about objects belonging to different accounts.
- Create garbage collection tasks.
- Create tasks to extract descriptors with a new neural network version.
- Receive reports and errors on processed tasks.
- Cancel and delete existing tasks.
Admin service has access to all the data attached to different accounts.
Three types of accounts can be created in the Admin service — "user", "advanced_user" and "admin". The first two types are created using an account creation request to the API service, but the third type can only be created using the Admin service.
Using the "admin" account type, you can log in to the interface and perform the above tasks. An account with the "admin" type can be created either in the user interface (see above) or by requesting the "/4/accounts" resource of the Admin service. To create an account in the last way, you need to specify a username and password.
If you are creating an account for the first time, you must use the default login and password.
Example of CURL request to the "/4/accounts" resource of the Admin service:
curl --location --request POST 'http://127.0.0.1:5010/4/accounts' \
--header 'Authorization: Basic cm9vdEB2aXNpb25sYWJzLmFpOnJvb3Q=' \
--header 'Content-Type: application/json' \
--data '{
  "login": "mylogin@gmail.com",
  "password": "password",
  "account_type": "admin",
  "description": "description"
}'
All the requests for Admin service are described in Admin service reference manual.
Admin user interface#
The user interface of the Admin service is designed to simplify the work with administrative tasks.
The interface can be opened in a browser by specifying the address and port of the Admin service: <Admin_server_address>:<Admin_server_port>.
The default Admin service port is 5010.
The default login and password to access the interface are root@visionlabs.ai/root. You can also use default login and password in Base64 format — cm9vdEB2aXNpb25sYWJzLmFpOnJvb3Q=.
You can change the default password for the Admin service using the "Change authorization" request.
There are three tabs on the page:
- Accounts. The tab is designed to provide information about all created accounts and to create new accounts.
- Tasks — The tab is designed for working with Garbage collection and Additional extraction tasks.
- Info — The tab contains information about the user interface and the LUNA PLATFORM license.
Accounts tab#
This tab displays all existing accounts.
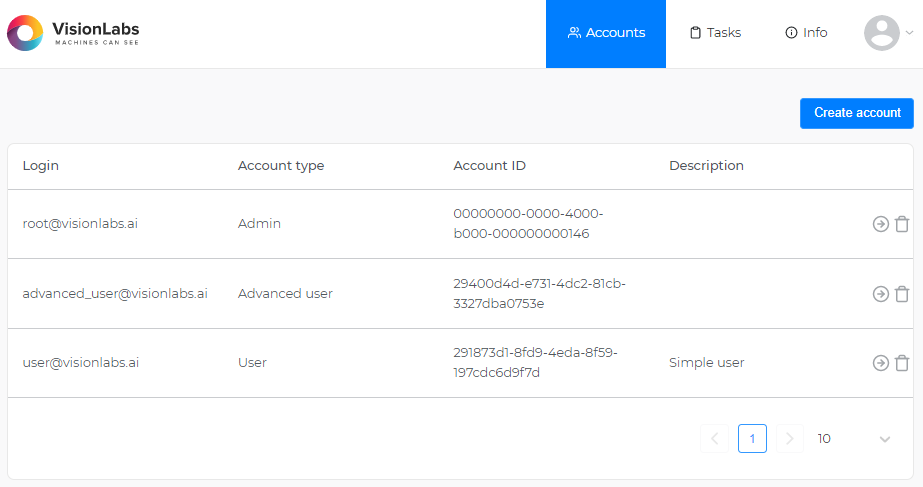
You can manage existing accounts using the following buttons:
![]() – View account information.
– View account information.
![]() – Delete account.
– Delete account.
Clicking the view info button opens a page containing general information about the account, lists created with that account, and faces.
When you click the "Create account" button, an account creation window opens, containing the standard account creation settings — login, password, account type, description and the desired "account_id".
See "Account" for details on accounts and their types.
Tasks tab#
This tab displays running/completed Garbage collection and Additional extraction tasks.
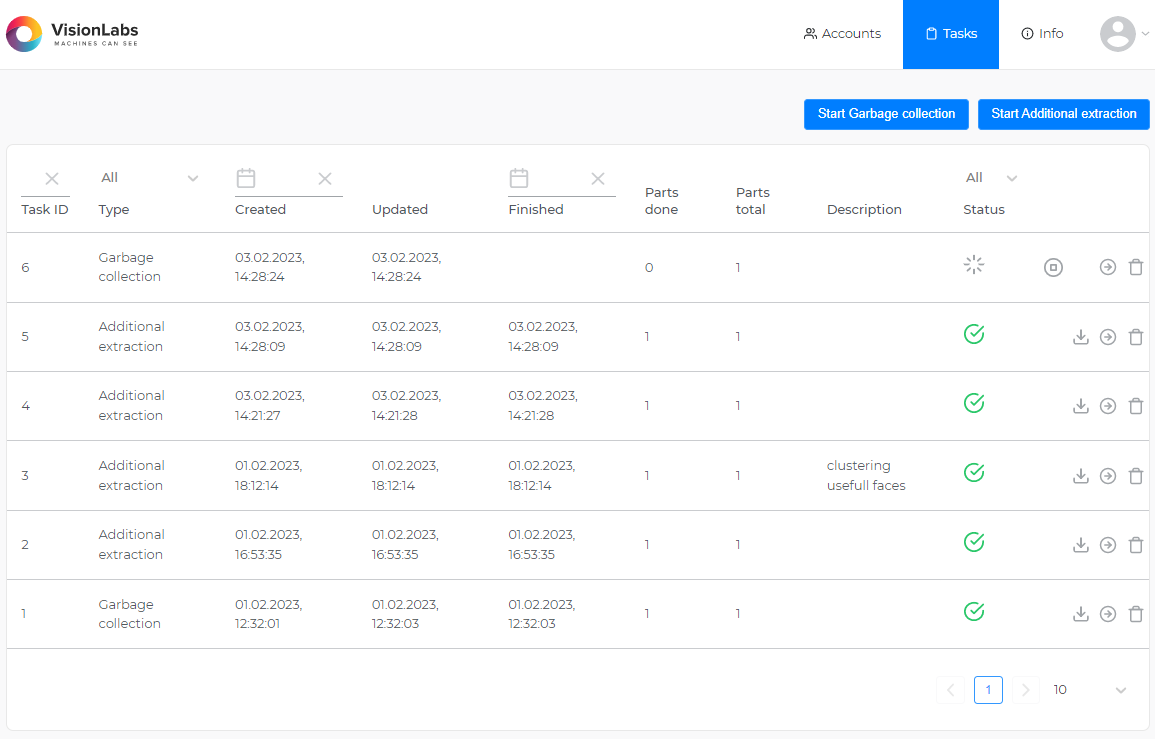
.
Tasks are displayed in a table whose columns can be sorted and also filtered by the date the tasks were completed.
When you press the "Start Garbage collection" and "Start Additional extraction" buttons, windows for creating the corresponding tasks open.
The "Garbage collection" window contains the following settings, similar to the parameters of the "garbage collecting task" request body to the Tasks service:
- Description — "description" parameter
- Target — "content > target" parameter
- Account ID — "content > filters > account_id" parameter
- Remove sample — "content > remove_samples" parameter
- Remove image origins — "content > remove_image_origins" parameter
- Delete data before — "content > create_time__lt" parameter
See "Garbage collection task" for details.
The "Additional extraction" window contains the following settings, similar to the parameters of the "additional extract task" request body to the Tasks service:
- Objects type — "content > filters > object_type" parameter
- Extraction type — "content > extraction_target" parameter
- Descriptor version — "content > options > descriptor_version" parameter
- Description — "description" parameter
- Account ID — "content > filters > account_id" parameter
See "Additional extraction task" for details.
After creating a task, its execution begins. The progress of the task is displayed by the icon ![]() . The task is considered completed when the "Parts done" value matches the "Parts total" value and the icon changes to
. The task is considered completed when the "Parts done" value matches the "Parts total" value and the icon changes to ![]() . If necessary, you can stop the task execution using the icon
. If necessary, you can stop the task execution using the icon ![]() .
.
The following buttons are available for each task:
![]() – download the task result as a JSON file.
– download the task result as a JSON file.
![]() – go to the page with a detailed description of the task and errors received during its execution.
– go to the page with a detailed description of the task and errors received during its execution.
![]() – delete task.
– delete task.
Tasks are executed by the Tasks service after receiving a request from the Admin service.
Schedules tab#
This tab is intended for working with task scheduling.

The tab displays all created task schedules and all relevant information (status, ID, Cron string, etc.).
When you click on the "Create schedule" button, the schedule creation window opens.
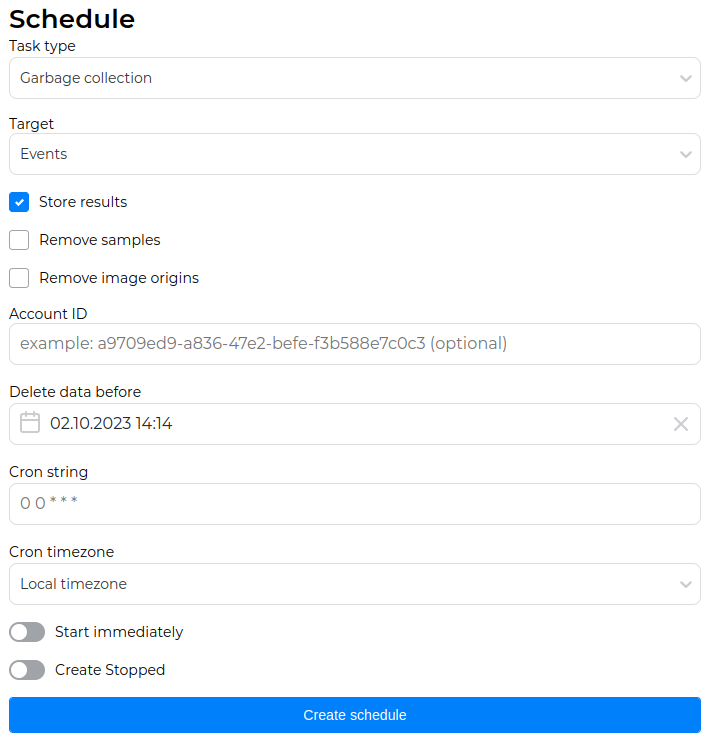
In the window you can specify schedule settings for the Garbage collection task. The parameters in this window correspond to the parameters of the "create tasks schedule" request.
After filling in the parameters and clicking the "Create schedule" button, the schedule will appear in the Schedules tab.
You can control delayed start using the following buttons:
![]() – start the schedule.
– start the schedule.
![]() – pause the schedule.
– pause the schedule.
Using the ![]() button, you can edit the schedule. Using the
button, you can edit the schedule. Using the ![]() button you can delete a schedule.
button you can delete a schedule.
Info tab#
This tab displays complete license information and features that can be performed using the Admin UI.
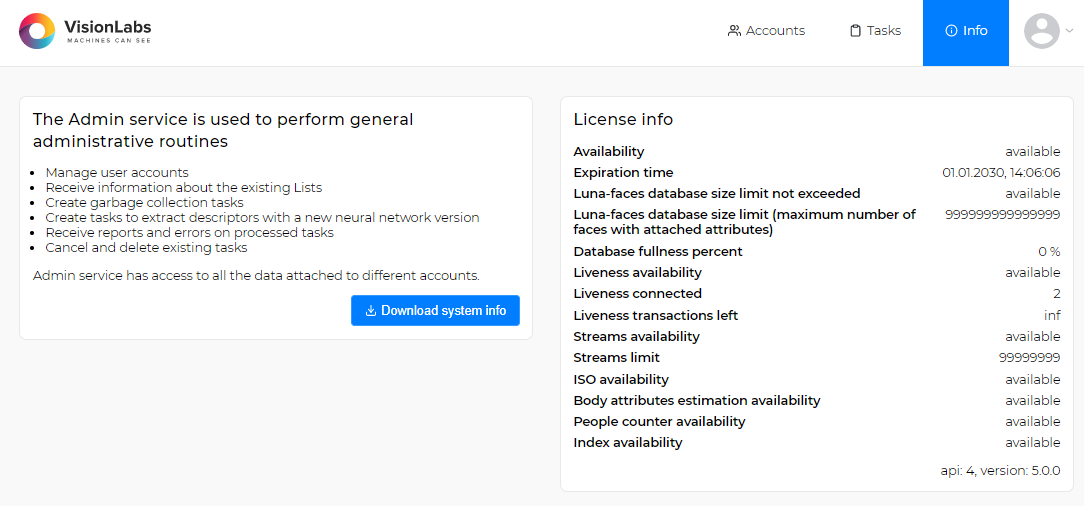
.
See the detailed license description in the "License information" section.
By clicking on the "Download system info" button, you can also get the following technical information about the LP:
- LUNA PLATFORM version
- Versions of the services
- Number of descriptors
- Configuration files values
- License information
- Requests and estimations statistics (see section "Requests and estimations statistics gathering")
You can also get the above system information using the "get system info" request to the Admin service.
Configurator service#
The Configurator service simplifies the configuration of LP services.
The service stores all the required configurations for all the LP services in a single place. You can edit configurations through the user interface or special limitation files.
You can also store configurations for any third-party party software in Configurator.
The general workflow is as follows:
- User edits configurations in the UI.
- Configurator stores all changed configurations and other data in the database.
- LP services request Configurator service during startup and receive all required configurations. All the services should be configured to use the Configurator service.

During Configurator installation, you can also use your limitation file with all the required fields to create limitations and fill in the Configurator database. You can find more details about this process in the Configurator development manual documentation.
Settings used by several services are updated for each of the services. For example, if you edit the "LUNA_FACES_ADDRESS" section for the Handlers service in the Configurator user interface, the setting will be also updated for API, Admin and Python Matcher services.
Configurator UI#
Open the Configurator interface in your browser: <Configurator_server_address> :5070
This URL may differ. In this example, the Configurator service interface is opened on the Configurator service server.
LP includes the beta version of the Configurator UI. The UI was tested on Chrome and Yandex browser. The recommended screen resolution for working with the UI is 1920 x 1080.
The following tabs are available in the UI of Configurator:
- Settings. All the data in the Configurator service is stored on the Settings tab. The tab displays all the existing settings. It also allows to manage and filter them;
- Limitations. The tab is used to create new limitations for settings. The limitations are templates for JSON files that contain available data type and other rules for the definition of the parameters;
- Groups. The tab allows to group all the required settings. When you select a group on the Settings tab, only the settings corresponding to the group will be displayed. It is possible to get settings by filters and/or tags for a single specific service. For this purpose, the Groups tab is used.
- About. The tab includes information about the Configurator service interface.
Settings#
Each of the Configurator settings contain the following fields:
- "Name" — Name for the setting.
- "Description" — Setting description.
- "ID and Times" — Unique setting ID.
- "Create time" — Setting create time.
- "Last update time" — Setting last update time.
- "Value" — Body of the setting.
- "Schema" — Verification template for the schema body.
- "Tag" — Tags for the setting used to filter settings for the services.
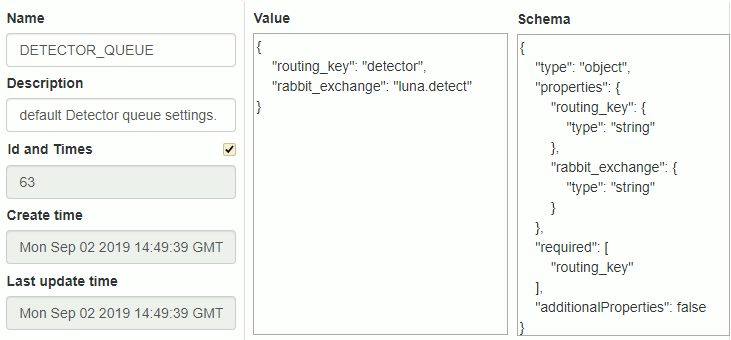
The "Tags" field is not available for the default settings. You should press the Duplicate button and create a new setting on the basis of the existing one.
The following options for the settings are available:
-
Create a new setting — press the Create new button, enter required values and press Create. You should also select an already existing limitation for the setting. The Configurator will try to check the value of a setting if the Check on save flag is enabled and there is a limitation selected for the setting;
-
Duplicate existing setting — press the Duplicate button on the right side of the setting, change required values and press Create. The Configurator will try to check the setting value if the Check on save flag is enabled on the lower left side of the screen and there is such a possibility;
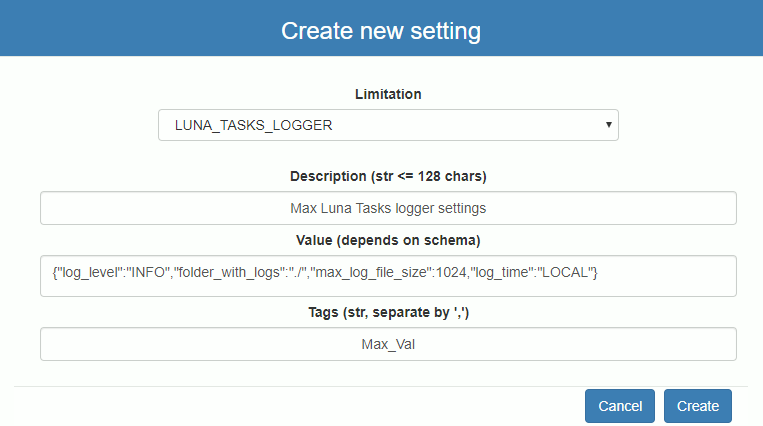
-
Delete existing setting — press the Delete button on the right side of the setting.
-
Update existing setting — change name, description, tags, value and press Save button on the right side of the setting.
-
Filter existing settings by name, description, tags, service names, groups — use the filters on the left side of the screen and press Enter or click on Search button;
Show limitations. The flags are used to enable displaying of limitations for each of the settings.
JSON editors. The flag enables you to switch the mode of the value field representation. If the flag is disabled, the name of the parameter and a field for its value are displayed. If the flag is enabled, the Value field is displayed as a JSON.
The Filters section on the left side of the window enables you to display all the required settings according to the specified values. You may enter the required name manually or select it from the list:
- Setting. The filter enables you to display the setting with the specified name.
- Description. The filter enables you to display all settings with the specified description or part of description.
- Tags. The filter enables you to display all settings with the specified tag.
- Service filter. The filter enables you to display all settings that belong to the selected service.
- Group. The filter enables you to display all settings that belong to the specified group. For example, you can select to display all the services belonging to LP.
Use tagged settings#
Using tagged settings, you can run several identical services that will use different settings from the Configurator.
To do this, follow these steps:
-
Duplicate or create a new setting by specifying a tag for it. For example, you can duplicate the "LUNA_EVENTS_DB" setting and assign it the "EVENTS_DB_TAG" tag.
-
Pass the following arguments to the command "run.py" the corresponding container:
-
--luna-config— flag containing the address of the Configurator service --<configuration_name>— flag containing the configuration and tag
See the "Service arguments" section of the installation guide for more information on the arguments.
For example, to configure "LUNA_EVENTS_DB" with the tag "EVENTS_DB_TAG", the container launch command will look like this:
docker run \
...
dockerhub.visionlabs.ru/luna/luna-events:v.4.13.11
python3 /srv/luna_events/run.py --luna-config http://127.0.0.1:5070/1 --LUNA_EVENTS_DB EVENTS_DB_TAG
Limitations#
Limitations are used as service settings validation schema.
Settings and limitations have the same names. A new setting is created upon limitation creation.
The limitations are set by default for each of the LP services. You cannot change them.
Each of the limitations includes the following fields:
- Name is the name of the limitation.
- Description is the description of the limitation.
- Service list is the list of services that can use settings of this limitation.
- Schema is the object with JSON schema to validate settings
- Default value is the default value created with the limitation.
The following actions are available for managing limitations:
- Create a new limitation — Press the Create new button, enter required values and press "Create". Also, the setting with default value will be created.
- Duplicate existing limitation — Press the Duplicate button on the right side of the limitation, change required values and press Create. Also, the setting with default value will be created.
- Update limitation values — Change name/description/service list/validation schema/default values and press the Save button on the right side of the limitation.
- Filter existing limitations by names, descriptions, and groups.
- Delete existing limitation — Press the Delete button on the right side of the limitation.
Groups#
Group has a name and a description.
It is possible to:
- Create a new group — Press the Create new button, enter the group name and optionally description and press Create.
- Filter existing groups by group names and/or limitation names — Use filters on the left side and press 'RETURN' or click on Search button.
- Update group description — Update the existing description and press the Save button on the right side of the group.
- Update linked limitation list — to unlink limitation, press "-" button on the right side of the limitation name, to link limitation, enter its name in the field at the bottom of the limitation list and press the "+" button. To accept changes, press the Save button.
- Delete group — Press the Delete button on the right side of the group.
Settings dump#
The dump file includes all the settings of all the LP services.
Receive settings dump#
You can fetch the existing service settings from the Configurator by creating a dump file. This may be useful for saving the current service settings.
To receive a dump file use the following options:
- wget:
wget -O settings_dump.json 127.0.0.1:5070/1/dump - curl:
curl 127.0.0.1:5070/1/dump > settings_dump.json - text editor
The current values, specified in the Configurator service, are received.
Apply settings dump#
To apply the dumped settings use the db_create.py script with the --dump-file command line argument (followed with the created dump file name): base_scripts/db_create.py --dump-file settings_dump.json.
You can apply full settings dump on an empty database only.
If the settings update is required, you should delete the whole "limitations" group from the dump file before applying it.
    "limitations":[
      ...
    ],
Follow these steps to apply the dump file:
-
Enter the Configurator container.
-
Run
python3 base_scripts/db_create.py --dump-file settings_dump.json.
Limitations from the existing limitations files are replaced with limitations from the dump file, if limitations names are the same.
Limitations file#
Receive limitation file#
Limitation file includes limitations of the specified service. It does not include existing settings and their values.
To download a limitations file for one or more services, use the following commands:
-
Enter the Configurator container.
-
Create the output "base_scripts/results" directory:
mkdir base_scripts/results -
Run the "base_scripts/get_limitation.py" script:
python3 base_scripts/get_limitation.py --service luna-image-store luna-handlers --output base_scripts/results/my_limitations.json.
Note the "base_scripts/get_limitation.py" script parameters:
--servicefor specifying one or more service names (required)--outputfor specifying the directory or a file where to save the output. The default value: "current_dir/{timestamp}_limitation.json" (optional)
Licenses service#
General information#
The Licenses service stores information about the available licensed features and their limits.
There are three ways to get license information:
- Using the "get license" request to the Licenses service.
- Using the "get system info" request to the Admin service.
- Using the user interface of the "Admin service".
You can also use the "get platform features" request to the API service, in the response to which you can get information about the license status, the license functions enabled ("face_quality", "body_attributes" and "liveness") and the status of optional services (Image Store, Events, Tasks and Sender) from the "ADDITIONAL_SERVICES_USAGE" configuration of the Configurator service.
If you disable some license feature and try to use a request that requires this function, error 33002 will be returned with the description "License problem Failed to get value of License feature {value}".
License information#
LP license includes the following features:
- License expiration date.
- Maximum number of faces with linked descriptors or basic attributes.
- OneShotLiveness estimation availability.
- OneShotLiveness current balance.
- Deepfake estimation availability.
- Image check according to ISO/IEC 19794-5:2011 standard availability.
- Body parameters estimation availability.
- People count estimation availability.
- Using Lambda service availability.
- Possibility of using the Index Matcher service in the LUNA Index Module.
- Maximum number of streams created by the LUNA Streams service.
When ordering the license, you need to inform technical support about the need to use any of the above features.
The features "Possibility of using the Index Matcher service in the LUNA Index Module" and "Maximum number of streams created by the LUNA Streams service" are described in the LUNA Index Module and FaceStream documentation, respectively.
Notifications are available for some features when approaching the limit. Notifications work in the form of sending messages to the logs of the corresponding service. For example, when approaching the allowable number of created faces with descriptors, the following message will be displayed in the Faces service logs: "License limit exceeded: 8% of the available license limit is used. Please contact VisionLabs for license upgrade or delete redundant faces". Notifications work due to constant monitoring implemented using the Influx database. Monitoring data is stored in the corresponding fields of the Influx database.
See the detailed information in the section "Monitoring".
Expiration date#
When the license expires, you cannot use LUNA PLATFORM.
By default, the notification about the end of the license is sent two weeks before the expiration date.
When the license ends, the following message is returned "License has expired. Please contact VisionLabs for a license extension.".
The Licenses service writes data about the license expiration date to the logs and the Influx database in the "license_period_rest" field.
Faces limit#
The Faces service checks the number of faces left according to the maximum available number of faces received from the Licenses service. The faces with linked descriptors or basic attributes are counted only.
The percentage of the used limit for faces is written in the Faces log and displayed in the Admin GUI.
The Faces service writes data about the created faces to the logs and the Influx database in the "license_faces_limit_rate" field.
The created faces are written in the Faces log and displayed in the Admin GUI as a percentage of the database fullness. You should calculate the number of faces with descriptors left using the current percentage.
You start receiving notifications when there are 15% of available faces left. When you exceed the number of available faces, the message "License limit exceeded. Please contact VisionLabs for license upgrade or delete redundant faces" appears in logs. You cannot attach attributes to faces if the number of faces exceeds 110%.
Consequences of missing a feature
If this feature is disabled, it will be impossible to perform the following requests:
- "create face"
- "generate events" specifying a handler with "policies" > "storage_policy" > "face_policy" > "store_face"
OneShotLiveness#
An unlimited license or a license with a limited number of transactions is available to estimate Liveness using the OneShotLiveness estimator.
Each use of Liveness in requests reduces the transaction count. It is impossible to use the Liveness score in requests after the transaction limit is exhausted. Requests that do not use Liveness and requests where the Liveness estimation is disabled are not affected by the exhaustion of the limit. They continue to work as usual.
The Licenses service stores information about the liveness transactions left. The number of transactions left is returned in the response from the "/license" resource.
The Remote SDK service writes data on the number of available Liveness transactions to the logs and the Influx database in the "liveness_balance" field.
A warning about the exhaustion of the number of available transactions is sent to the monitoring and logs of the Remote SDK service when the remaining 2000 transactions of Liveness are reached (this threshold is set in the system).
See the "OneShotLiveness description" section for more information on how Liveness works.
Consequences of missing a feature
If this feature is disabled, it will be impossible to estimate Liveness (the "estimate_liveness" parameter) in the following requests:
- "sdk"
- "detect faces"
- "generate events" specifying a handler with "policies" > "detect_policy" > "estimate_liveness"
- "perform verification" specifying a handler with "policies" > "detect_policy" > "estimate_liveness"
- "estimator task" specifying a handler with "policies" > "detect_policy" > "estimate_liveness"
- "predict liveness"
Body parameters estimation#
This feature enables you to estimate body parameters. Two values can be set in the license — 0 or 1. Monitoring is not intended for this parameter.
Consequences of missing a feature
If this feature is disabled, it will be impossible to estimate the body parameters (parameters "estimate_upper_body", "estimate_lower_body", "estimate_body_basic_attributes", "estimate_accessories") in the following requests:
- "sdk"
- "generate events" specifying a handler with "policies" > "detect_policy" > "body_attributes"
People count estimation#
This feature enables you to estimate the number of people. Two values can be set in the license — 0 or 1. Monitoring is not intended for this parameter.
Consequences of missing a feature
If this feature is disabled, it will be impossible to estimate the number of people (the "estimate_people_count" parameter) in the following requests:
- "sdk"
- "generate events" specifying a handler with "policies" > "detect_policy" > "estimate_people_count"
Image check by ISO/IEC 19794-5:2011 standard#
This feature enables you to perform various image checks by ISO/IEC 19794-5:2011 standard. Two values can be set in the license — 0 or 1. Monitoring is not intended for this parameter.
Consequences of missing a feature
If this feature is disabled, it will be impossible to perform the following requests:
- "iso"
- "detect faces" with the parameter "estimate_face_quality"
- "generate events" specifying a handler with "policies" > "detect_policy" > "face_quality"
- "estimator task" specifying a handler with "policies" > "detect_policy" > "face_quality"
- "perform verification" specifying a handler with "policies" > "detect_policy" > "face_quality"
Video analytics services#
Video analytics services are designed to process video files or video streams to perform various analytical tasks. These tasks can include counting people, tracking people in the frame, detecting fights, and more.
Hereafter, in the documentation, the term stream will be used to denote the processed entity (video file or video stream).
The operation of video analytics services is based on the interaction of three key components: analytics, agents, and the Video Manager service.
Analytics
Analytics is a set of algorithms that perform specific tasks for processing streams. Each analytic has a set of parameters that can be configured by the user. The Video Manager stores information about available analytics and passes it to the agents that implement the corresponding algorithms.
Agent
An agent is a component that implements video analytics algorithms. It receives streams, performs the specified analytics, and sends the results through callbacks or via web sockets and the Sender service. Each agent can support the execution of one or more analytics, depending on its configuration and capabilities.
You can use the Video Agent service as an agent or write your own agent. See the example code in the Video Manager service developer guide.
Currently, the Video Agent service provides only one analytic - counting the number of people. In future releases, the list of analytics will be expanded.
Video Manager
The Video Manager acts as a coordinator between users and agents. It contains information about available analytics and distributes video streams for processing among agents. The Video Manager is also responsible for managing streams, monitoring their status, and coordinating automatic restarts in case of errors.
See detailed information about the interaction between the Video Manager service and the agent in the section "Video manager and agent ideo services
The basic principle of operation is as follows:

- The user makes a request to create a stream using the "create stream" request.
- The Video Manager service directs the stream to an agent capable of processing all the analytics specified in the request.
- The agent processes the stream and sends the processing status and any possible errors to the Video Manager service.
- The agent sends the processing results through callbacks or via web sockets and the Sender service. See detailed information on notification types in the section "Send events to third-party service".
The user can also recreate the stream, get the stream processing status, stop and start the stream, etc. See detailed information in the streams request group of the OpenAPI specification.
See detailed information on how the user interacts with video analytics services in the section "User and Video Manager interaction".
See the section "Quick start guide to create stream" below to learn the basic steps for creating a stream.
See detailed information in the section "Video manager and agent intecation".
Analytics#
From the perspective of the Video Manager service, an analytic is an object containing a name, an unknown set of parameters, and, if necessary, a description and documentation. An analytic is created either by an agent or by an administrator by sending a "create analytic" request to the Video Manager service.
The Video Agent service currently offers only one analytic -
people_count. The analytic is automatically registered when the Video Agent service is started. This analytic can only be performed if the corresponding licensable feature is available. See the section "People counting video analytics".
The Video Manager distributes streams among agents based on the knowledge of which agent can perform which analytic. When an agent or administrator creates an analytic, they can specify a set of parameters that will be used when the analytic is started. However, when making a stream processing request, the user can specify other parameters that will be used for that analytic (using the "analytics" > "parameters" parameter in the "create stream" request).
Detailed information about available parameters and their descriptions varies for each analytic. It is available in the corresponding analytic's documentation and can be obtained in response to a "get analytics" request.
User and Video Manager interaction#
To perform stream analytics, the user must create a stream, specifying the desired analytic.
To create a stream, a "create stream" request must be made. To recreate a stream, a "put stream" request must be made, in which case new stream data will be used, and the stream version will be incremented by 1.
Once a new stream appears, it transitions to the status "pending".
When the stream is being processed by one of the available agents (see the section "Stream distribution"), its status will be "in_progress".
While the stream is being processed, the agent sends feedback to the Video Manager service, which creates logs that the user can obtain by making a "get streams logs" request.
Stream processing can be stopped:
-
by user request ("patch stream" request with the parameter "action" = "stop"). In this case, the stream status will be "stop".
-
by user request ("remove stream" request). In this case, the stream will be deleted.
-
when the stream ends. In this case, the stream status will be "done".
-
in the event of a fatal error. In this case, the stream status will be "failure".
In all cases, except for manual log deletion using the "delete stream logs" request, stream logs will be available after making a "get streams logs" request.
In all cases, except for stream deletion using the "remove stream" request, stream data will be available after making a "get stream" request.
Video Manager and agent interaction#
The interaction between the Video Manager service and the agent is described below:
-
The agent or administrator must register an analytic that the agent can handle with the Video Manager service by making a request to the
/1/analyticresource of the Video Manager service. -
At startup, the agent must make a request to the
/1/agentresource of the Video Manager service to register itself. This request specifies the following parameters:- agent name (required)
- maximum number of streams the agent can handle (required)
- set of analytics the agent can handle (required)
- agent description
In response to the request, the agent will receive a unique "agent_id".
-
The agent must periodically make requests to the
/1/agent/{agent_id}/streamsresource of the Video Manager service to obtain/stop a stream for processing.Once the agent receives a stream for processing, the Video Manager service starts the stream counter being processed by this agent.
Note that if the agent does not make such a request in time, the agent's status will be marked as "not_ready" and the agent will be excluded from the list of agents that can process streams (see the section "Managing agent status in case of no agent request" for details).
-
During processing, the agent must send feedback on the stream processing status to the
/1/agent/{agent_id}/streams/feedbackresource.The report contains the stream identifier, its status, error, stream version, and report generation time. After sending the report, the user can obtain the processing logs using the "get streams logs" request.
Note that a user agent must perform the above actions. See the example code in the "Agent interaction" section of the Video Manager service developer guide.
The Video Agent service automatically performs the above actions.
Streams#
Streams are created by the user using the "create stream" request.
The user can set the name of the stream, its description, add information about the city or street, configure automatic restart of the stream, set the parameters of stream grouping, analytics, as well as the following general data for stream processing:
- "type" - Source type: videofile or videostream
- "reference" - Source reference.
- "rotation" - Angle of camera frame rotation.
-
"downloadable" - Determines whether the video file should be pre-downloaded before it is processed.
Pre-downloading is necessary for:
- Successful decoding of video files. Some files may experience decoding errors if the files are not saved first.
- Long processing processes. If video processing takes a significant amount of time, storing prevents problems associated with connection breaks.
Note that sometimes security policies prohibit saving video files. In such cases, pre-downloading may not be applicable.
-
"timestamp_source" - Specifies where the timestamps for video analysis are to be sourced from. The following values are available:
- "pts" - Uses video timestamps if present for precise playback time representation. Timestamps might not always be accurate (see below).
- "server" - Utilizes server time for the video stream, ensuring consistency and synchronization with other events.
- "frame_rate" - Employs frame rate for video files, helping to approximate timestamps.
- "auto" (default) - Automatically selects the time source, first checking timestamps ("pts"), and then switching to server time ("server") or frame rate ("frame_rate") if timestamps are inaccurate.
Accurate timestamps for a video file mean that the time stamps (PTS) should be close to zero, that is, the time from the beginning of the video to the tag should be relatively small (the absolute value should not exceed 10^5 seconds).
Accurate timestamps for a video stream mean that the stream time differs from the server time by less than 1 day.
-
"pts" > "start_time" - Sets a custom offset for video timestamps (PTS).
Specifying an offset allows synchronization of video processing start with a specific point in time. This is useful, for example, if the video is processed in segments and it is necessary for the timestamps of new segments to continue from the previous ones. Consequently, when splitting a large video into smaller segments, the timestamps will appear as though a single continuous video was processed.
Stream format supported by Video Agent service#
The Video Agent service can process streams in various formats. If the stream format does not match the supported ones, an error occurs. In this case, logs are recorded, and the stream is considered unsuccessful. In general, the Video Agent service supports processing all streams that can be processed using ffmpeg, but there is a known limitation on the pixel format. The Video Agent service supports the following pixel formats: BGR, BGR_32F, NV12, P10, P12, RGB, RGB_32F, RGB_32F_PLANAR, RGB_PLANAR, YCBCR, YUV420, YUV420_10bit, YUV422, YUV444, YUV444_10bit.
If the stream has a format that is not supported, it can be transcoded, for example, using ffmpeg:
ffmpeg -i input.mp4 -c:v h264 -pix_fmt nv12 output.mp4
Important: The above description only applies to the Video Agent service. If the user has their own agent, they must configure the stream processing format independently.
Stream statuses#
A stream can have the following statuses:
- "pending" — Stream is taken for processing, but no agent has been found yet. This status can be immediately after creation, recreation of the stream, and during automatic restart.
- "in_progress" — Stream is being processed by an agent.
- "done" — Stream has been fully processed.
- "restart" — Server restarted the processing of the stream using automatic restart.
- "failure" — Error report was received from the agent about the stream processing.
- "cancel" — Processing of the stream was canceled because the stream was removed from the Video Manager service.
- "stop" — Stream was stopped using the "patch stream" request.
Stream Lifecycle#
The lifecycle of a stream is described below:
- The stream is created using the "create stream" request. The status changes to "pending".
- The agent accepts the stream for processing. The status changes to "in_progress".
- Optional. Stopping/resuming stream processing:
- The "patch stream" request with the "action" = "stop" parameter is executed. The status changes to "stop".
- The "patch stream" request with the "action" = "resume" parameter is executed. The status changes to "pending" until the next agent takes the stream for processing. Then the status changes to "in_progress".
- End of processing:
- The stream ends. The agent stops processing and sends feedback to the Video Manager service. The status changes to "done".
- The stream is deleted using the "remove stream" request.
- Processing ends due to an error sent by the agent in the feedback. The stream status changes to "failure".
Streams automatic restart#
The automatic restart feature is only relevant for streams with a "failure" status. The automatic restart parameters (restart possibility, maximum number of restart attempts, delay between attempts) are set by the user for each stream in the "autorestart" section of the "create stream" request. The parameters and status of the automatic restart can be obtained using the "get stream" request.
The automatic restart statuses are listed below:
- "disabled" — automatic restart is disabled by the user (the "restart" parameter is disabled).
- "enabled" — automatic restart is enabled but currently inactive because the stream is not in the "failure" status.
- "in_progress" — automatic restart is in progress.
- "failed" — the allowable number of automatic restart attempts has been exceeded and none were successful.
Stream distribution#
The Video Manager service distributes streams provided by users to agents as follows:
- Selects all streams that require processing (only streams with a "pending" status are processed). See the "Stream Statuses" section for more detailed information.
- Selects all available agents whose current processing stream count does not reach the maximum number of streams available for simultaneous processing by the agent. See the "Video Manager and Agent Interaction" section for more detailed information.
- Sequentially selects an agent for each stream that meets the following conditions:
- The agent can process the analytics specified for the stream.
- There is a free slot for the stream (the agent provides the
max_stream_countparameter - the maximum number of streams available for simultaneous processing, so the number of simultaneous streams for the agent cannot exceed this number).
- Makes the necessary entries in the database to respond to the agent's request according to the previous logic.
- The agent receives 2 types of streams through the "get agent streams" request — streams that need to be processed and streams whose processing should be stopped. A stream once mentioned in the response as a stream whose processing should start will no longer be mentioned in the responses to this request until its processing needs to be stopped. The same applies to streams whose processing needs to be stopped — they will no longer be mentioned in the responses to this request until their processing needs to start again.
The described procedure will be performed as a periodic background task of the main instance. The execution period can be configured using the luna_video_manager_streams_agent_search_interval parameter. It is recommended to consult VisionLabs specialists before changing this parameter.
Process of restarting streams#
The process of handling streams with enabled automatic restart is described below. The described actions will be performed as a periodic background task of the main instance of the Video Manager service. The execution period can be configured using the luna_video_manager_streams_autorestarter_interval parameter. It is recommended to consult VisionLabs specialists before changing this parameter.
When an attempt is made to automatically restart a stream, the following changes occur:
- The stream status changes first to "restart" and then to "pending".
- The automatic restart attempt counter "current_attempt" increases by 1.
- The "last_attempt_time" entry updates to reflect the current time.
For a restart to occur, the following conditions must be met:
- The stream status must be "failure".
- Automatic stream restart must be enabled (the "restart" parameter).
- The value of the current automatic restart attempt "current_attempt" must be "null" or less than the maximum number of attempts "attempt_count".
- The last automatic restart attempt time "last_attempt_time" must be "null" or the difference between the current time and the last attempt time must be greater than or equal to the delay "delay".
If the conditions below are met, the automatic restart of the stream will fail (stop restart attempts):
- The stream status is "failure".
- The stream's automatic restart status is "in_progress".
- The current automatic restart attempt value "current_attempt" equals the maximum number of attempts "attempt_count".
If the conditions below are met, the automatic restart of the stream will end:
- The stream status is not "failure".
- The stream's automatic restart status is "in_progress".
- The last automatic restart attempt time "last_attempt_time" is "null" or the difference between the current time and the last attempt time is greater than or equal to the delay "delay".
Streams grouping#
Streams can be grouped. Grouping is intended to combine streams from multiple cameras into logical groups. For example, streams can be grouped by geographic location.
A stream can be associated with multiple groups.
A group is created using the "create group" request. To create a group, the mandatory "group_name" parameter must be specified. If necessary, a group description can be specified.
A stream can be associated with a group using the "group_name" or "group_id" parameters when creating the stream ("create stream" request).
If the stream was associated with a group, the group will be reflected in the "groups" field in the "get stream" or "get streams" request.
Work with multiple instances#
Each instance of the Video Manager service can handle a limited number of user requests, and each agent can analyze a limited number of streams, so these services can be scaled so that each Video Manager service has access to the same database and each agent has access to one of the instances of the Video Manager service.
All running instances of the Video Manager service select the main instance for the correct execution of key processes such as:
- distribution of streams between agents
- automatic restart of streams
- processing streams in case of no feedback
- managing agent status in case of no agent request
These processes should only be performed by one instance to avoid a race condition where multiple instances attempt to perform the same tasks simultaneously, which can lead to system malfunctions.
Selecting main instance#
To select the main instance, each instance of the service attempts to acquire a database lock by updating a field in the single_process_lock table. If an instance succeeds in acquiring the lock, it is declared the main instance and maintains this state by regularly sending a "heartbeat" signal to the database. This signal allows other instances to know that the main instance is active and performing its tasks. If the "heartbeat" signal from the main instance stops, it indicates that the main instance is no longer active, and any other instance can attempt to become the new main instance by acquiring the database lock.
Thus, the selection of the main instance ensures coordination and prevents conflict situations, guaranteeing that only one instance performs critical tasks at any given time.
Processing streams in case of no feedback#
The process of handling video streams involves receiving feedback for each stream in the "in_progress" state. The Video Manager service periodically checks the last feedback time for each stream. If feedback has not been received within the set time, the stream status will change to "restart", indicating an attempt to restart the stream processing. Then the stream status immediately changes to "pending" to queue it for processing.
The condition check for updating stream statuses is performed as a periodic background task by the main instance. The execution period can be configured using the luna_video_manager_stream_status_obsoleting_interval parameter. Streams will be considered obsolete if the last feedback time exceeds the set period, which can be configured using the luna_video_manager_stream_status_obsoleting_period parameter.
It is recommended to consult VisionLabs specialists before changing these parameters.
Managing agent status in case of no agent request#
Interaction with agents implies periodic requests to the Video Manager service (see the "Video Manager and agent interaction" section). The Video Manager service periodically checks the last request time from agents for stream processing, and if this time was too long ago, the agent's status changes to "not_ready", which means excluding the agent from the stream distribution queue.
If such an agent later makes a request for stream processing, its status will be updated to "ready", and the agent will be added to the list of agents that can process streams.
The condition check for handling streams in case of no agent request is performed as a periodic background task by the main instance. The execution period can be configured using the luna_video_manager_agent_status_obsoleting_interval parameter. Agents will be considered not ready if the last request from the agent was not received on time, which can be configured using the luna_video_manager_agent_status_obsoleting_period parameter.
It is recommended to consult VisionLabs specialists before changing these parameters.
Quick start guide to create stream#
This example will describe the basic steps for creating a stream, processing it, and viewing the processing results. The Video Agent service will be used as an agent.
1) Prepare the request body "create stream".
The "analytics" > "parameters" section is different for each analytics type. Since the user can write his own agent that processes his own analytics, the API service (or Video Manager) specification cannot contain a list of available analytics parameters. When writing an agent, the user must write his own OpenAPI specification containing valid parameters. In the case of the Video Agent service, the specification has already been written by VisionLabs developers and can be accessed by request "get analytic documentation". In the request, you must specify the analytics identifier, which is assigned to the analytics during the request for its registration when the agent starts (see section "Video Manager and agent interaction". The identifier can be obtained using request "get analytics").
In other words, to fill out the "analytics" > "parameters" section, you need to get the analytics documentation using the request "get analytic documentation", specifying the analytics identifier, which can be obtained from using the request "get analytics".
The request "get analytic documentation" involves accessing the resource
/6/analytics/{analytic_id}/docs. It is recommended to open this resource in a browser or specify the header "Accept" = "text/html" for correct display of HTML documentation.
An example of obtaining documentation is given below:
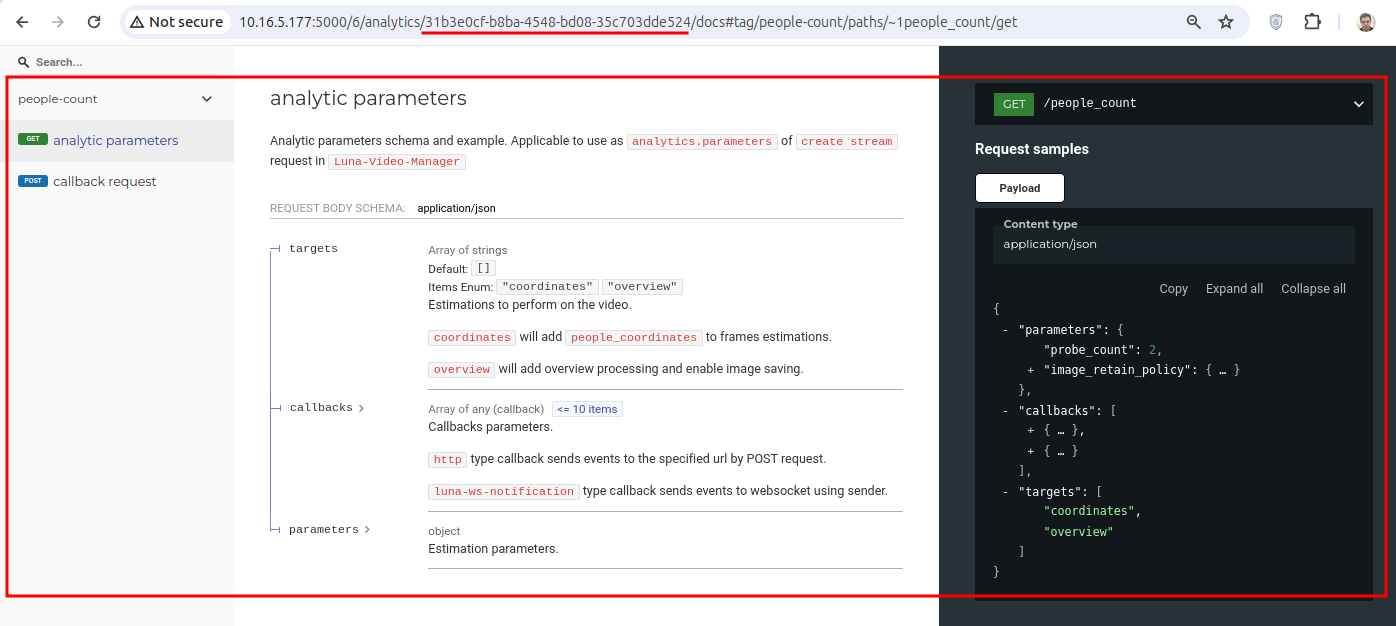
The contents of the analytics parameters must be added to the body of the request "create stream".
For example, you could create the following request body for the people_count analytics:
{
    "name": "name_example",
    "description": "description_example",
    "data": {
        "type": "videofile",
        "reference": "https://example.com/humantracking.mp4",
        "rotation": 0
    },
    "location": {
        "city": "Moscow",
        "area": "Central",
        "district": "Basmanny",
        "street": "Podsosensky lane",
        "house_number": "23 bldg.3",
        "geo_position": {
            "longitude": 36.616,
            "latitude": 55.752
        }
    },
    "autorestart": {
        "restart": 0,
        "attempt_count": 10,
        "delay": 60
    },
    "analytics": [
        {
            "analytic_name": "people_count",
            "parameters": {
                "parameters": {
                    "probe_count": 2,
                    "image_retain_policy": {
                        "mimetype": "PNG"
                    }
                },
                "callbacks": [
                    {
                        "url": "http://127.0.0.1:5007/mock",
                        "type": "http",
                        "trigger": {
                            "threshold": 2
                        }
                    }
                ],
                "targets": [
                    "coordinates",
                    "overview"
                ]
            }
        }
    ]
}
Note that the example above uses a mock server to receive notifications about the stream being processed. You must configure the servers yourself or establish a connection via web sockets.
2) Get the results of processing the stream on your mock server.
Lambda service#
The Lambda service is intended to work with user modules that mimic the functionality of a separate service. The service enables you to write and use your own handler or write an external service that will closely interact with the LUNA PLATFORM and immediately have several functions typical of LP services (such as logging, automatic configuration reload, etc.).
The Lambda service creates a Docker image and then runs it in a Kubernetes cluster. It is impossible to manage a custom module without Kubernetes. Full-fledged work with the Lambda service is possible when deploying LUNA PLATFORM services in Kubernetes. To use it, you must independently deploy LUNA PLATFORM services in Kubernetes or consult VisionLabs specialists. If necessary, you can use Minikube for local development and testing, thus providing a Kubernetes-like environment without the need to manage a full production Kubernetes cluster.
This functionality should not be confused with the plugin mechanism. Plugins are designed to implement narrow targeted functionality, while the Lambda service enables you to implement the functionality of full-fledged services.
It is strongly recommended to learn as much as possible about the objects and mechanisms of the LUNA PLATFORM (especially about handlers) before starting to work with this service.
A custom module running in a Kubernetes cluster is called lambda. Information about the created lambda is stored in the Lambda database.
The number of lambda created is unlimited. Each lambda has the option to add its own OpenAPI specification.
To work with the Lambda service, you need a special license feature. If the feature is not available, the corresponding error will be returned when requesting the creation of lambda.
Note: The description given below is intended for general acquaintance with the functionality of the Lambda service. See developer manual for more details. The "Quick start guide" section is available in the developer manual, which enables you to start working with the service.
Before start#
Before you start working with the Lambda service, you need to familiarize yourself with all the requirements and set the service settings correctly.
Code and archive requirements#
The module is written in Python and must be transferred to the Lambda service in a ZIP archive.
The code and archive must meet certain requirements, the main of which are listed below:
- Python version 3.11 or higher must be used.
- Development requires the "luna-lambda-tools" library, available in VisionLabs PyPI.
- Archive should not be password-protected.
Also, the files in the archive must have a certain structure. See the detailed information in the section "Requirements" of the developer manual.
Environment requirements#
To work with the Lambda service, the following environment requirements are required:
- Availability of running Licenses and Configurator services*.
- Availability of S3 bucket for storing archives.
- Availability of Docker registry for storing images.
- Availability of Kubernetes cluster.
* during its operation, lambda will additionally interact with some LUNA PLATFORM services. The list of services depends on the lambda type (see "Lambda types").
If necessary, you can configure TTL for storing archives in S3. See "Migration to apply TTL to objects in S3".
Write/read access to the S3 storage bucket must be provided and certain access rights in the Kubernetes cluster must be configured. You need to transfer the basic Lambda images to your Docker registry. The commands for transferring images are given in the LUNA PLATFORM installation manual.
When the Lambda service starts, the Docker registry and base images are checked.
For more information, see the "Requirements" section of the developer manuals.
Lambda service configuration#
In the Lambda service settings, you must specify the following data:
-
Location of the Kubernetes cluster (see setting "CLUSTER_LOCATION"):
-
"internal" — Lambda service works in a Kubernetes cluster and does not require other additional settings.
- "remote" — Lambda service works with a remote Kubernetes cluster and correctly defined settings "CLUSTER_CREDENTIALS" (host, token and certificate).
- "local" — Lambda service works in the same place where the Kubernetes cluster is running.
In the classic version of working with the Lambda service, it is assumed to use the "internal" parameter.
-
S3 bucket settings (see setting "S3").
-
Registry address for storing the Docker image (see setting "LAMBDA_REGISTRY").
-
Addresses of insecure registries that may need access during lambda creation (see setting "LAMBDA_INSECURE_REGISTRIES").
For more information, see the "Configuration requirements" section of the developer manual.
Configuring lambda entities#
A specific set of settings is available for running lambda entities. They can be set in the Configurator by filtering the settings by the name "luna-lambda-unit".
The settings for the Lambda service and the settings for lambda entities are different.
The settings contain service addresses, connection timeouts, logging settings, etc., allowing lambda entities to effectively interact with LUNA PLATFORM services. See all available settings in the section "Lambda configuration".
The settings apply to all lambda at the same time.
Lambda types#
Lambda can be of three types:
- Handlers-lambda, intended to replace the functionality of the classic handler.
- Standalone-lambda, intended to implement independent functionality to perform close integration with the LUNA PLATFORM.
- Tasks-lambda, intended to implement additional custom long task types.
Each type has certain requirements for LUNA PLATFORM services, the actual settings of which will be automatically used to process requests. Before starting work, the user must decide which lambda he needs.
Handlers-lambda#
Examples of possible functionality:
- Performing verification with the possibility of saving an event.
- Matching of two images without performing the rest of the functionality of the classic handler.
- Adding your own filtering logic to the matching functionality;
- Circumventing certain limitations of the LUNA PLATFORM (for example, specify the maximum number of candidates greater than 100).
- Embedding the neural network SDK bypassing the LUNA PLATFORM.
During its operation, Handlers-lambda will interact with the following LUNA PLATFORM services:
- Configurator — To get the settings.
- Faces — For working with faces and lists.
- Remote SDK — For performing detections, estimations and extractions.
- Events* — For working with events.
- Python Matcher/Python Matcher Proxy** — For classical/cross-matching of faces or bodies.
- Image Store* — For storing samples and source images of faces or bodies.
The Lambda service will not check the connection to the disabled services and will give an error if the user tries to make a request to the disabled service.
To run the Lambda service, only the presence of the Configurator and Licenses services is required.
* the service can be disabled in the "ADDITIONAL_SERVICES_USAGE" setting.
** the service is disabled by default. To enable the service, see the setting "ADDITIONAL_SERVICES_USAGE".
The Lambda-handler can be used in two cases:
- As a custom handler that has its own response scheme, which may differ from the response of classic handlers and cannot be properly used in other LUNA PLATFORM services.
-
As a custom handler that mimics the response of a classic handler. There are some requirements for such a case:
- The response must match the response scheme of the event generation request.
- The handler must process incoming data correctly so that other services can use it, otherwise there is no guarantee of compatibility with other services. That is, if such a handler implies face recognition, the module should return information about face recognition in response, if the handler implies body detection, the module should return body detection in response, etc.
For example, if a Lambda handler satisfies the above conditions, then it can be used in Estimator task as a classic handler.
For more information and code examples for Handlers-lambda, see the "Handlers lambda development" section of the developer manual.
Standalone-lambda#
Examples of possible functionality:
- Filtering incoming images by format for subsequent sending to the Remote SDK service.
- Creation of a service for sending notifications by analogy with the Sender service.
- Creation of a service for recording a video stream and saving it as a video file to the Image Store service for subsequent processing by the FaceStream application.
During its operation, Standalone-lambda will interact at least with the Configurator service, which enables lambda to receive its settings (for example, logging settings).
To run the Lambda service, only the presence of the Configurator and Licenses services is required.
For more information and sample code for Standalone-lambda, see the "Standalone lambda development" section of the developer manual.
Tasks-lambda#
Examples of possible functionality:
- Unlink faces from lists if faces do not similar to the specified face.
- Remove duplicates from list.
- Recursively find events similar to the specified photo.
During its operation, Tasks-lambda will interact with the following LUNA PLATFORM services:
- Configurator
- Faces
- Python Matcher
- Remote SDK
- Tasks
- Events*
- Image Store*
- Handlers*
* the service can be disabled in the "ADDITIONAL_SERVICES_USAGE" setting
After creating lambda, the "lambda task" requests must be executed to create a Lambda task. The results of the task/subtask can be obtained using standard Tasks service requests.
The Lambda task is created according to the general task creation process, except that the Lambda service is used instead of the Tasks worker.
When writing code for Tasks-lambda, it is recommended to break each task into subtasks for the convenience of representing the process and parallelizing the execution of tasks.
You can create schedule for Tasks-lambda.
For more information and code examples for Tasks-lambda, see "Tasks lambda development" in the developer manual.
Create lambda#
To create a lambda, you need to do the following:
- Write Python code in accordance with the type of future lambda and code requirements.
- Move files to the archive in accordance with archive requirements.
- Perform the "create lambda" request, specifying the following mandatory data:
- "archive" — The address to the archive with the user module.
- "credentials" > "lambda_name" — The name for the lambda being created.
- "parameters" > "lambda_type" — The type of lambda being created ("handlers", "standalone" or "tasks").
Also optionally in the "deploy_parameters" section you can set the number of pods, allocate resources to pods, set namespaces, as well as enable GPU use.
It is also possible to specify labels for running lambda using specific Kubernetes nodes using the "deploy_parameters" > "selector" parameter. This enables for more granular control over lambda deployment, allowing administrators to specify the nodes on which lambda should be deployed based on their resource needs. By applying labels to Kubernetes nodes and using the "selector" parameter, administrators can manage resource allocation not only for individual lambdas, but also for lambda sections with similar resource requirements.
If necessary, you can specify a list of additional Docker commands to create a lambda container. See the "Lambda — Archive requirements" section of the developer manual.
In response to a successful request, the "lambda_id" will be issued.
The creation of lambda consists of several stages, namely:
- Creating a Docker image:
- Getting the provided ZIP archive.
- Addition of the archive with the necessary files.
- Saving the archive in S3 storage.
- Publishing the image to the registry.
- Creating a service in the Kubernetes cluster.
During lambda creation, you can run the following requests:
- "get lambda image creation status" to get the Docker image creation status ("in_progress", "error", "completed", "not_found")
- "get lambda image creation logs" to get Docker image creation logs
- "get lambda status" to get the lambda creation status ("running", "waiting", "terminated", "not_found")
See the lambda creation sequence diagram in "Lambda creation diagram".
See the detailed description of the lambda creation process in the "Creation pipeline" section of the developer manual.
Create handler for Handlers-lambda#
If lambda is supposed to be used as a custom handler simulating the response of a classic handler, then it is necessary to create a handler, specifying "handler_type" = "2" and the resulting "lambda_id".
During the creation of the handler, the Handlers service will perform a health check to the Kubernetes cluster.
The resulting "handler_id" can be used in requests "generate events" or "estimator task".
Use lambda#
The table below shows resources for working with lambda, depending on its type.
| Resource | Lambda type | Request and response body format |
|---|---|---|
| "/lambdas/{lambda_id}/proxy" | Standalone-lambda, Handlers-lambda with own response scheme | Own |
| "/handlers/{handler_id}/events" | Handlers-lambda | Corresponding OpenAPI specification |
| "/tasks/estimator" | Handlers-lambda | Corresponding OpenAPI specification |
See the lambda processing sequence diagram in "Lambda processing diagram".
Each lambda has its own API, the description of which is also available using the "get lambda open api documentation" request.
Each lambda response will contain multiple headers, including:
- "Luna-Request-Id" — Classic external ID of the LUNA PLATFORM request.
- "Lambda-Version" — Contains the current lambda version.
Useful requests when working with lambda:
- "get lambda status" to get lambda creation status ("running", "waiting", "terminated", "not_found")
- "get lambda" to get complete information about the created lambda (creation time, name, status, etc.)
- "get lambda logs" to get lambda creation logs
Create GPU-enabled lambda#
It is possible to create a lambda that can leverage graphics processing unit (GPU) resources. To enable GPU usage, the "deploy_parameters" > "enable_gpu" parameter must be included in the lambda creation request.
Lambda supports only NVIDIA graphics processors. For additional information on GPU usage, refer to the Kubernetes documentation.
If there is only one GPU available but more are required, you can enable shared GPU access (refer to the official documentation).
The Lambda service does not manage cluster resources, including GPU allocation. Resource management is handled by the Kubernetes administrator.
Additionally, when deploying LUNA PLATFORM to Kubernetes, it is recommended to configure the manifest in a specific way for all containers that use the GPU (including the Lambda service container) to avoid problems with device visibility. For detailed information, refer to the "Configuring manifest GPU support" section in the installation manual.
Update lambda#
The base image for lambda containers is updated periodically. This image contains the necessary modules to interact with LUNA PLATFORM services. Applying updates requires that the lambda be recreated so that the container can be rebuilt based on the new image. After updating the base image and the "luna-lambda-tools" library, lambda functionality may be broken.
You can update the lambda using the request "update lambda" using the latest base image. It is recommended to have a backup copy of the archive on S3.
See the "Lambda updates" section of the developer manual for detailed information about the update mechanism, backup strategies, and restoring from a backup.
Backport 3#
The Backport 3 service is used to process the requests for LUNA PLATFORM 3 using LUNA PLATFORM 5.
Although most of the requests are performed in the same way as in LUNA PLATFORM 3, there are still some restrictions. See "Backport 3 features and restrictions" for details.
See Backport 3 OpenAPI specification for details about the Backport 3 API.
Backport 3 new resources#
Liveness estimation#
Backport 3 provides Liveness estimation in addition to the LUNA PLATFORM 3 features. See the "liveness > predict liveness" section in the Backport 3 OpenAPI specification.
Handlers#
The Backport 3 service provides several handlers: "extractor", "identify", "verify". The handlers enable to perform several actions in a single request:
-
"handlers" > "face extractor" — Enables you to extract a descriptor from an image, create a person with this descriptor, attach the person to the predefined list.
-
"handlers" > "identify face" — Enables you to extract a descriptor from an image and match the descriptor with the predefined list of candidates.
-
"handlers" > "verify face" — Enables you to extract a descriptor from an image and match the descriptor with the person's descriptor.
The description of the handlers and all the parameters of the handlers can be found in the following sections:
- "handlers" > "patch extractor handler"
- "handlers" > "patch verify handler"
- "handlers" > "patch identify handler"
The requests are based on handlers and unlike the standard "descriptors" > "extract descriptors", "matching" > "identification", and "matching" > verification" requests the listed above request are more flexible.
You can patch the already existing handlers thus applying additional estimation to the requests. E. g. you can specify head angles thresholds or enable/disable basic attributes estimation.
The Handlers are created for every new account at the moment the account is created. The created handlers include default parameters.
Each of the handlers has the corresponding handler in the Handlers service. The parameters of the handlers are stored in the luna_backport3 database.
Each handler supports GET and PATCH requests thus it is possible to get and update parameters of each handler.
Each handler has its version. The version is incremented with every PATCH request. If the current handler is removed, the version will be reset to 1:
-
For the requests with POST and GET methods:
If the Handlers and/or Backport 3 service has no handler for the specified action, it will be created with default parameters.
-
For requests with PATCH methods:
If Handlers and/or Backport 3 service has no handler for the specified action, a new handler with a mix of default policies and policies from the request will be created.
Backport 3 architecture#
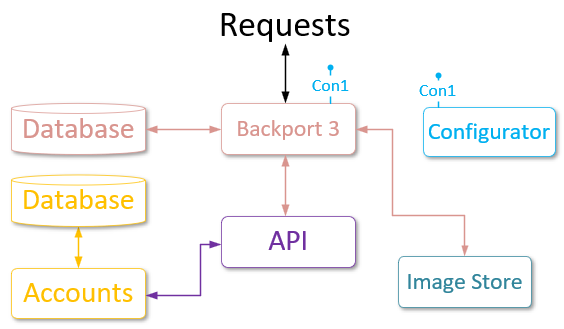
Backport 3 interacts with the API service and sends requests to LUNA PLATFORM 5 using it. In turn, the API service interacts with the Accounts service to check the authentication data.
Backport 3 has its own database (see "Backport 3 database"). Some of its tables are similar to the tables of the Faces database of LP 3. It enables you to create and use the same entities (persons, account tokens and accounts) as in LP 3.
The backport service uses Image Store to store portraits.
You can configure Backport 3 using the Configurator service.
Backport 3 features and restrictions#
The following features have core differences:
For the following resources on method POST default descriptor version to extract from image is 56:
/storage/descriptors/handlers/extractor/handlers/verify/handlers/identify/matching/search
You can still upload the existing descriptors of versions 52, 54, 56. The older descriptor versions are no longer supported.
- For resource /storage/descriptors on method POST, estimation of "saturation" property is no longer supported, and the value is always set to 1.
- For resource /storage/descriptors on method POST, estimation of "eyeglasses" attribute is no longer supported. The attributes structure in the response will lack the "eyeglasses" member.
- For resource /storage/descriptors on method POST, head position angle thresholds can still be sent as float values in range [0, 180], but they will be internally rounded to integer values. As before, thresholds outside the range [0, 180] are not taken into account.
Garbage collection (GC) module#
According to LUNA PLATFORM 3 logic, garbage is the descriptors that are linked neither to a person nor to a list.
For normal system operation, one needs to regularly delete garbage from databases. For this, run the system cleaning script remove_not_linked_descriptors.py from ./base_scripts/gc/ folder.
According to Backport 3 architecture, this script removes faces, which do not have links with any lists or persons from the Backport 3 database, from the Faces service.
Script execution pipeline#
The script execution pipeline consists of several stages:
- A temporary table is created in the Faces database. See more info about temporary tables for oracle or postgres.
- IDs of faces that are not linked to lists are obtained. The IDs are stored in the temporary table.
-
While the temporary table is not empty, the following operations are performed:
-
The batch of IDs from the temporary table is obtained. First 10k (or less) face ids are received.
- Filtered IDs are obtained. Filtered IDs are ids that do not exist in the "person_face" table of the Backport 3 database.
- Filtered IDs are removed from the Faces database. If some of the faces cannot be removed, the script stops.
- Filtered IDs are removed from the Backport 3 database (foolcheck). A warning will be printed.
- IDs are removed from the temporary table.
Script launching#
docker run --rm -t --network=host --entrypoint bash dockerhub.visionlabs.ru/luna/luna-backport-3:v.0.11.30 -c "python3 ./base_scripts/gc/remove_not_linked_descriptors.py"
The output will include information about the number of removed faces and the number of persons with faces.
Backport 4#
The Backport 4 service is used to process the requests for LUNA PLATFORM 4 using LUNA PLATFORM 5.
Although most of the requests are performed in the same way as in LUNA PLATFORM 4, there are still some restrictions. See "Backport 4 features and restrictions" for details.
See Backport 4 OpenAPI specification for details about the Backport 4 API.
Backport 4 architecture#
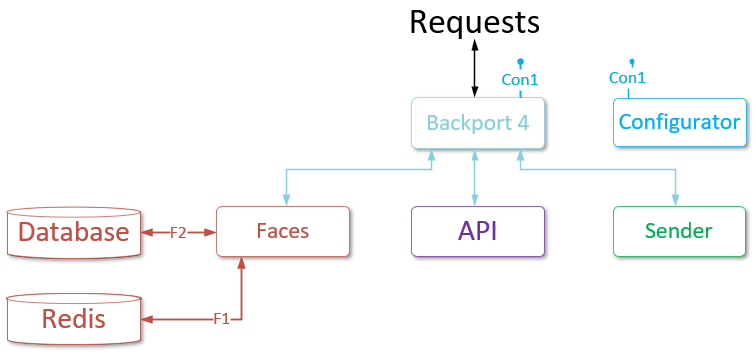
Backport 4 interacts with the API service and sends requests to LUNA PLATFORM 5 using it.
Backport 4 directly interacts with the Faces service to receive the number of existing attributes.
Backport 4 directly interacts with the Sender service. All the requests to Sender are sent using the Backport 4 service. See the "ws" > "ws handshake" request in the Backport 4 OpenAPI specification.
You can configure Backport 4 using the Configurator service.
Backport 4 features and restrictions#
The following features have core differences:
The current versions for LUNA PLATFORM services are returned on the request to the /version resource. For example, the versions of the following services are returned:
- "luna-faces"
- "luna-events"
- "luna-image-store"
- "luna-python-matcher" or "luna-matcher-proxy"
- "luna-tasks"
- "luna-handlers"
- "luna-api"
- "LUNA PLATFORM"
- "luna-backport4" — Current service
Resources changelog:
-
Resource
/attributes/countis available without any query parameters and does not support accounting. The resource works with temporary attributes. -
Resource
/attributeson method GET: "attribute_ids" query parameter is allowed instead of "page", "page_size", "time__lt" and "time__gte" query parameters. Thus you can get attributes by their IDs not by filters. The resource works with temporary attributes. -
Resource
/attributes/<attribute_id>on methods GET, HEAD, DELETE and resource/attributes/<attribute_id>/sampleson method GET interact with temporary attributes and return attribute data if the attribute TTL has not expired. Otherwise, the "Not found" error is returned. -
If you already used the attribute to create a face, use the "face_id" to receive the attribute data. In this case, the "attribute_id" from the request is equal to "face_id".
-
Resource
/facesenables you to create more than one face with the same "attribute_id". -
Resource
/faces/<face_id>on method DELETE enables you to remove face without removing its attribute. -
Resource
/faces/<face_id>on method PATCH enables you to patch attribute of the face making the first request to patch "event_id", "external_id", "user_data", "avatar" (if required) and the second request to patch attribute (if required). -
If face attribute_id is to be changed, the service will try to patch it with temporary attribute data if the temporary attribute exists. Otherwise, the service tries to patch it with attribute data from the face with "face_id" = "attribute_id".
-
The match policy of resource
/handlersnow has the default match limit that is configured using the "MATCH_LIMIT" setting from the Backport 4 "config.py" file. -
Resource
/events/statson method POST: "attribute_id" usage in "filters" object was prohibited as this field is no longer stored in the database. The response with the 403 status code will be returned. -
The "attribute_id" in events is not null and is equal to "face_id" for back compatibility. GC task is unavailable because all the attributes are temporary and will be removed automatically. Status code 400 is returned on a request to the
/tasks/gcresource. -
The column "attribute_id" is not added to the report of the Reporter task and this column is ignored if specified in the request. Columns "top_similar_face_id", "top_similar_face_list", "top_similar_face_similarity" are replaced by the "top_match" column in the report if any of these columns is passed in the reporter task request.
-
Linker task always creates new faces from events and ignores faces created during the event processing request.
-
Resource
/matcherdoes not check the presence of provided faces thus error "FacesNotFound" is never returned. If the user has specified a non-existent candidate of type "faces", no error will be reported, and no actual matching against that face will be made. -
Resource
/matcherchecks whether reference with type attribute has the ID of face attribute or the ID of temporary attribute and performs type substitution. Hence it provides sending references for matching in the way it was done in the previous version. -
Resource
/matchertakes matching limits into account. By default, the maximum number of references or candidates is limited to 30. If you need to overcome these limits, configure "reference_limit" and "candidate_limit". -
Resource
/wshas been added. There was no/wsresource in the LUNA PLATFORM 4 API as it was a separate resource of the Sender service. This added resource is similar to the Sender service resource, except that "attribute_id" of candidates faces is equal to "face_id". -
Resource
/handlersreturns the error "Invalid handler with id {handler_id}", if the handler was created in the LUNA PLATFORM 5 API and is not supported in LUNA Backport 4.
Backport 4 User Interface#
The User Interface service is used for the visual representation of LP features. It does not include all the functionality available in LP. User Interface enables you to:
- Download photos and create faces using them.
- Create lists.
- Match existing faces.
- Show existing events.
- Show existing handlers.
All the information in User Interface is displayed according to the account data, specified in the configuration file of the User Interface service ()./luna-ui/browser/env.js.
User Interface works with only one account at a time, which must be of "user" type.
You should open your browser and enter the User Interface address. The default value is: <server_url>:4200.
You can select a page on the left side of the window.
Lists/faces page#
The starting page of User Interface is Lists/Faces. It includes all the faces and lists created using the account specified in the configuration.
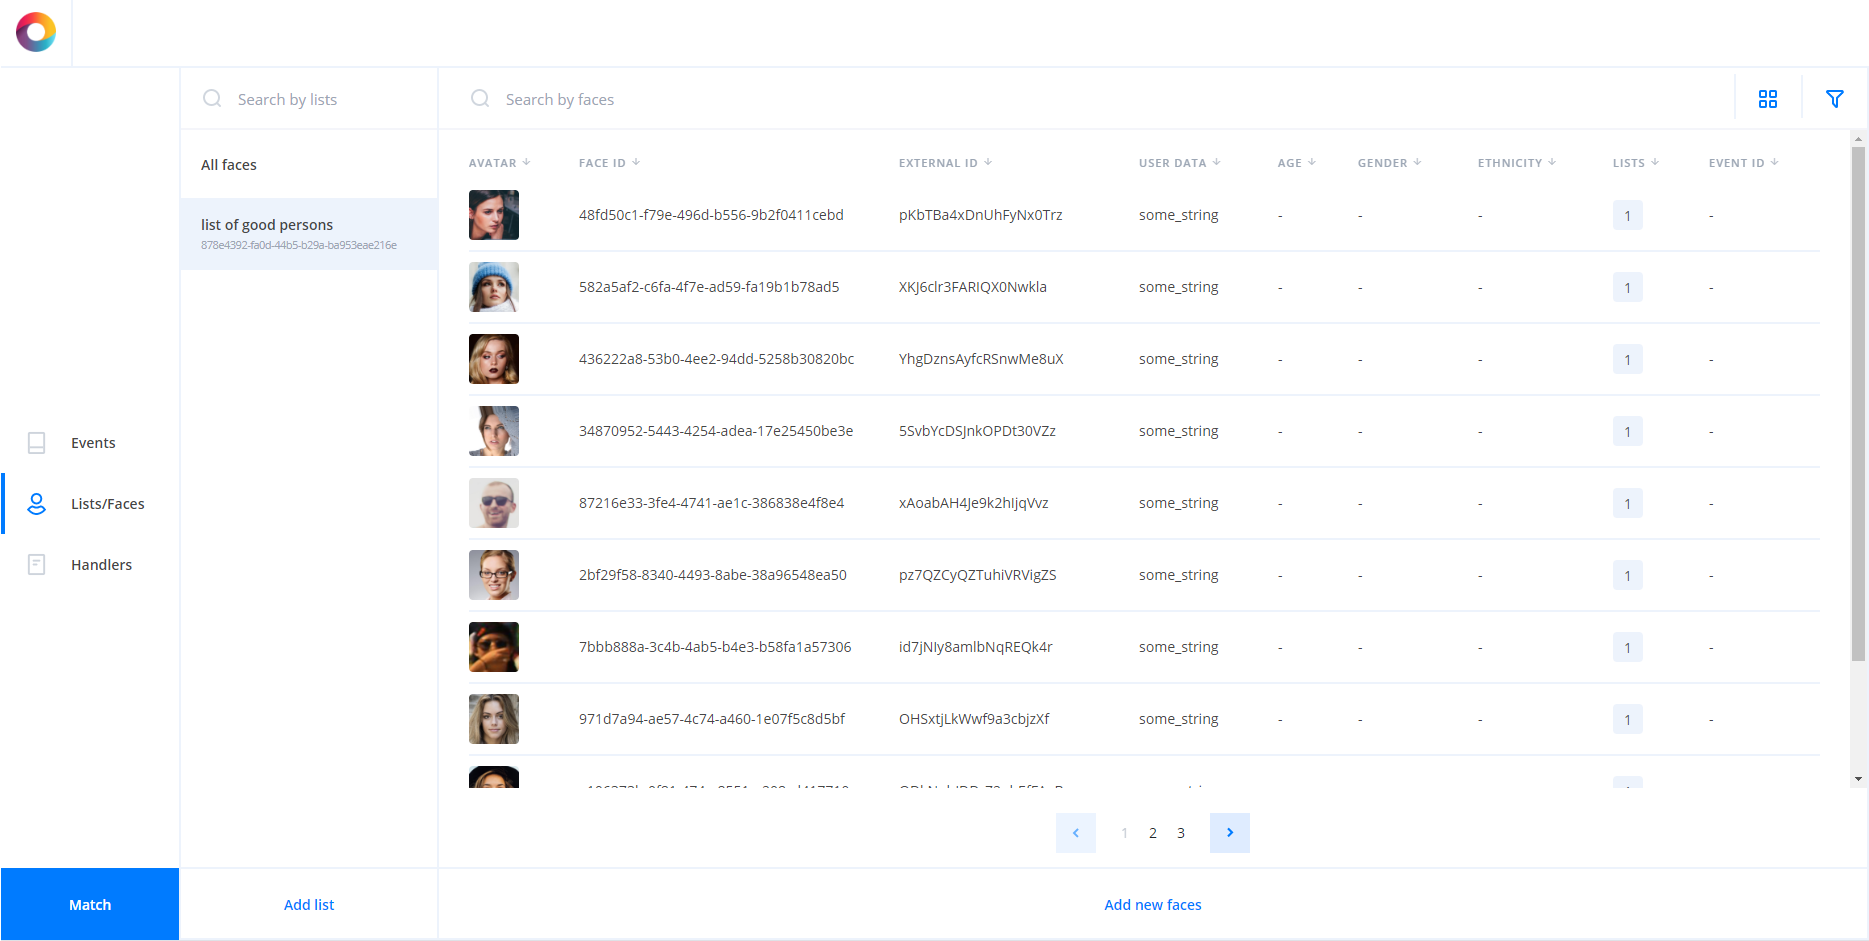
The left column of the workspace displays existing lists. You can create a new list by pressing the Add list button. In the appeared window you can specify the user data for the list.
The right column shows all the created faces with pagination.
Use the Add new faces button to create new faces.
On the first step, you should select photos to create faces from. You can select one or several images with one or several faces in them.
After you select images, all the found faces will be shown in a new dialog window.
All the correctly preprocessed images will be marked as "Done". If the image does not correspond to any of the requirements, an error will be displayed for it.
Press the Next step button.
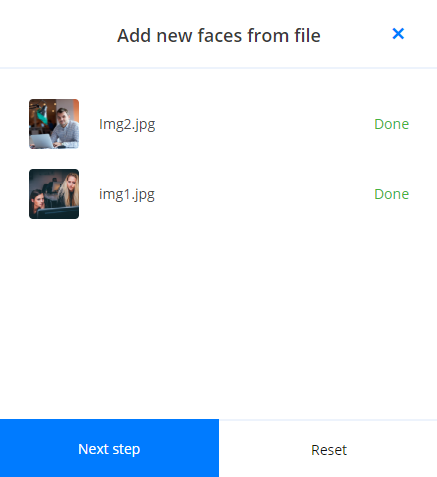
On the next step, you should select the attributes to extract for the faces.
Press the Next step button.
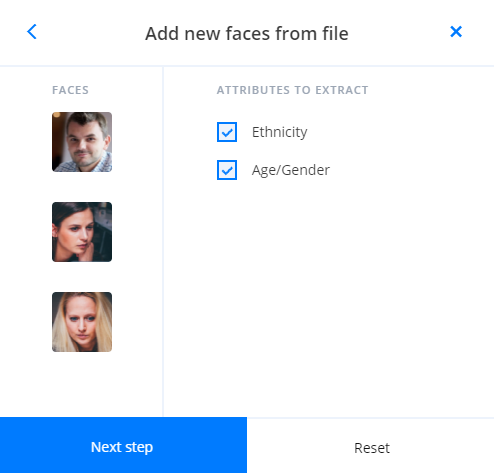
On the next step, you can specify user data and external ID for each of the faces. You can also select lists to which each of the faces will be added. Press Add Faces to create faces.
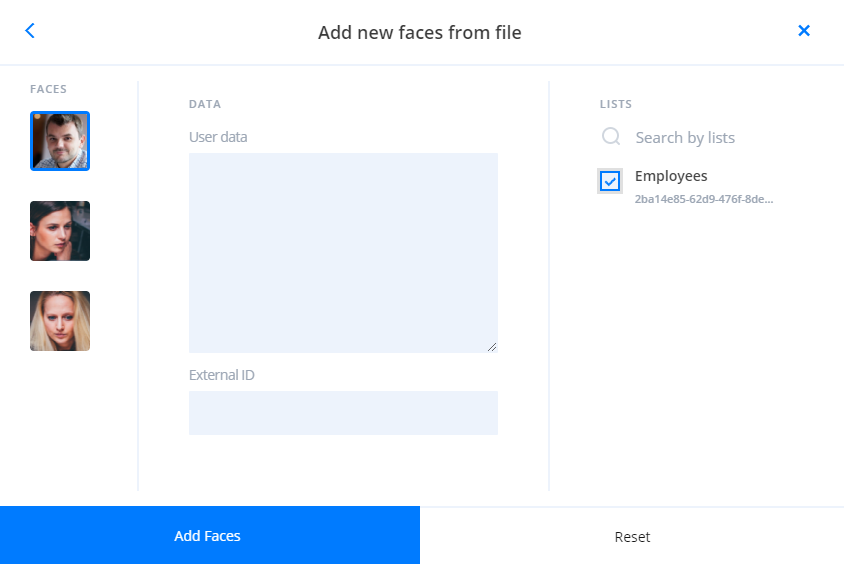
You can change pages using arrow buttons.

You can change the display of faces and filter them using buttons in the top right corner.
Filer faces. You can filter faces by ID, external ID or list ID.
/
![]()
Change view of the existing faces.
Handlers page#
Handlers page displays all handlers created using the account specified in the configuration.
All the information about specified handler policies is displayed when you select a handler.
You can edit or delete a handler using edit 
and delete 
icons.
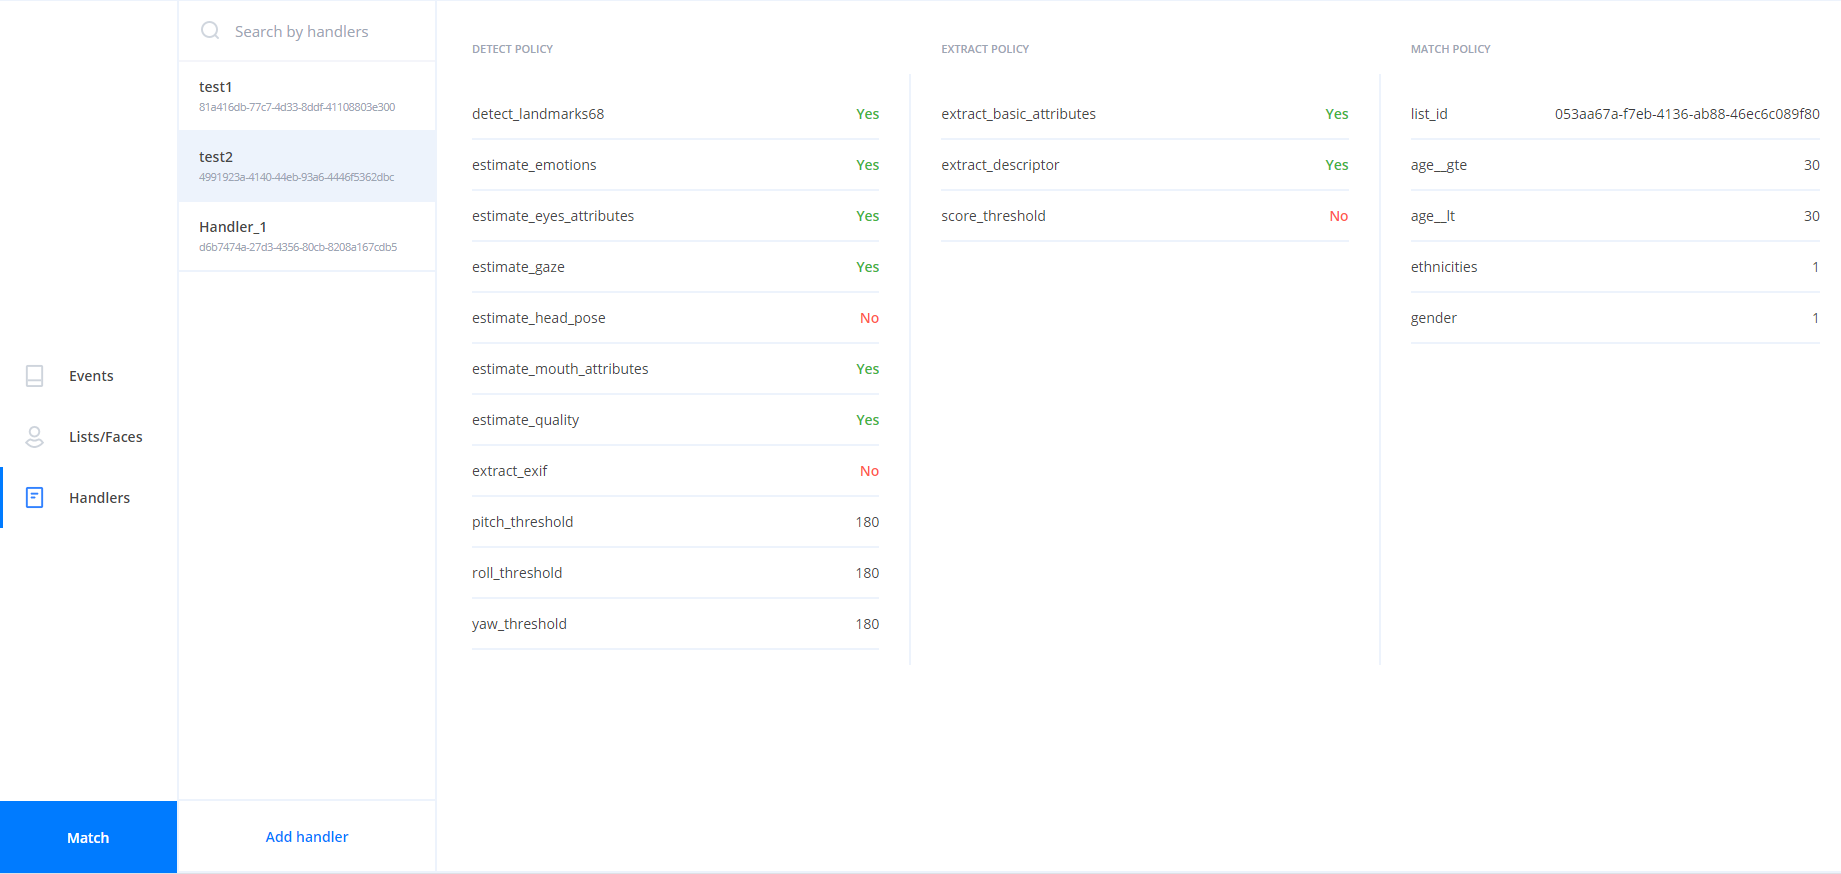
Events page#
The events page displays all the events created using the account specified in the configuration.
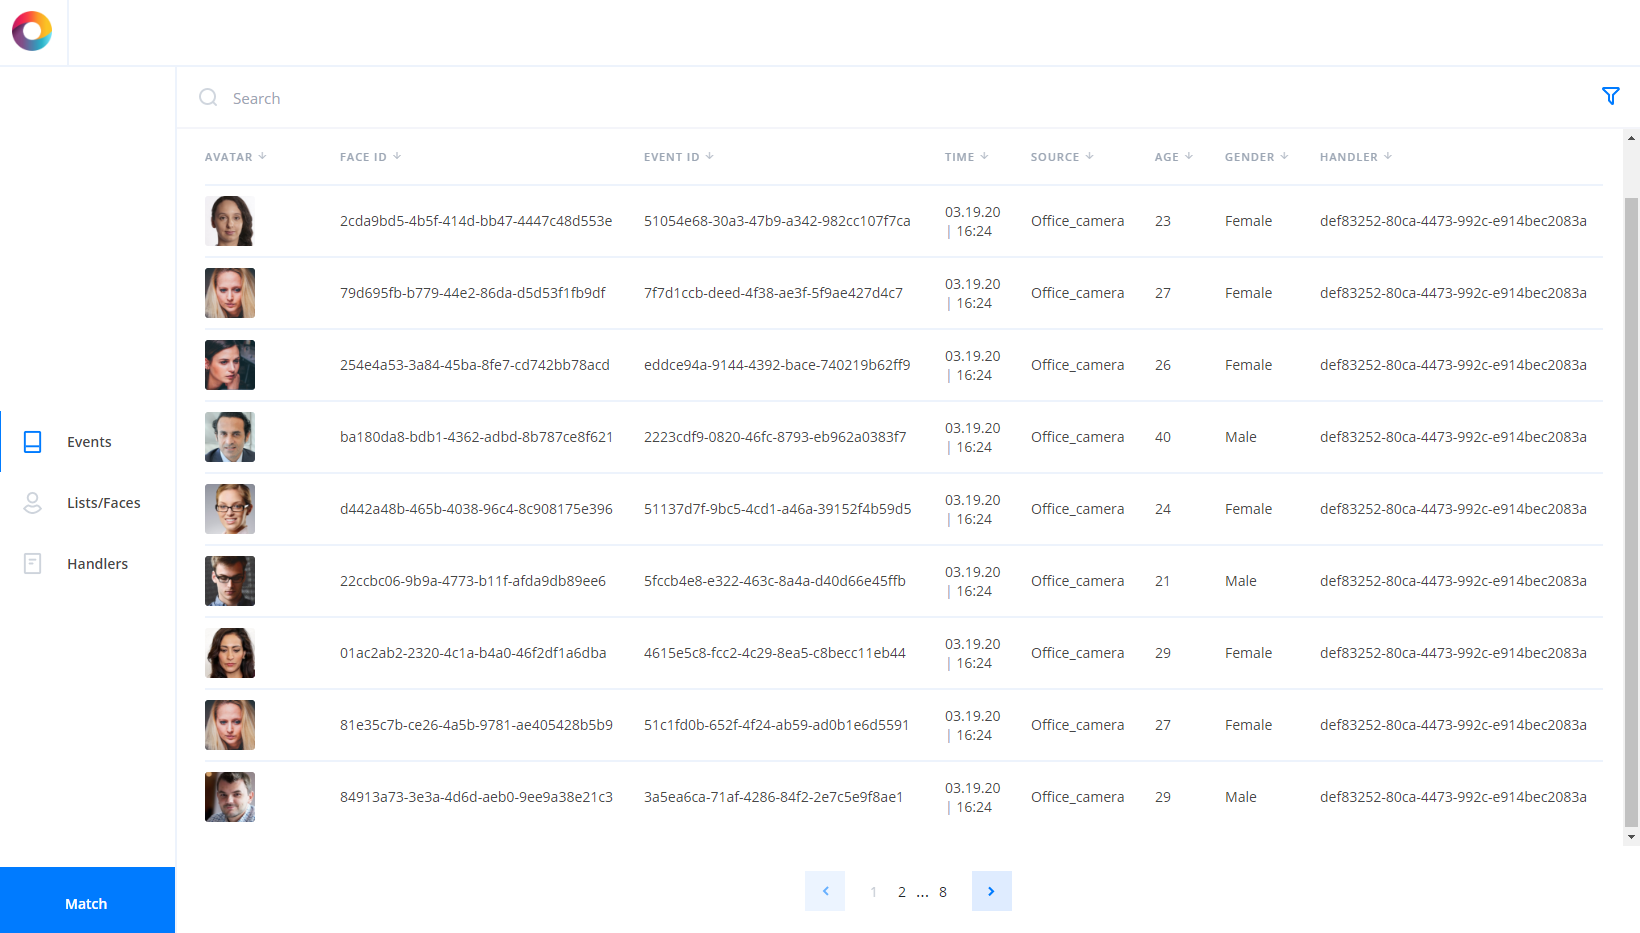
It also includes filters for displaying of events ![]()
.
Common information#
You can edit
or delete
an item (face, list or handler) using special icons. The icons appear when you hover the cursor on an item.

Matching dialog#
The Matching button in the bottom left corner of the window enables you to perform matching.
After pressing the button you can select the number of the received results for each of the references.
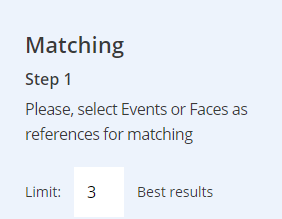
On the first step, you should select references for matching. You can select faces and/or events as references.
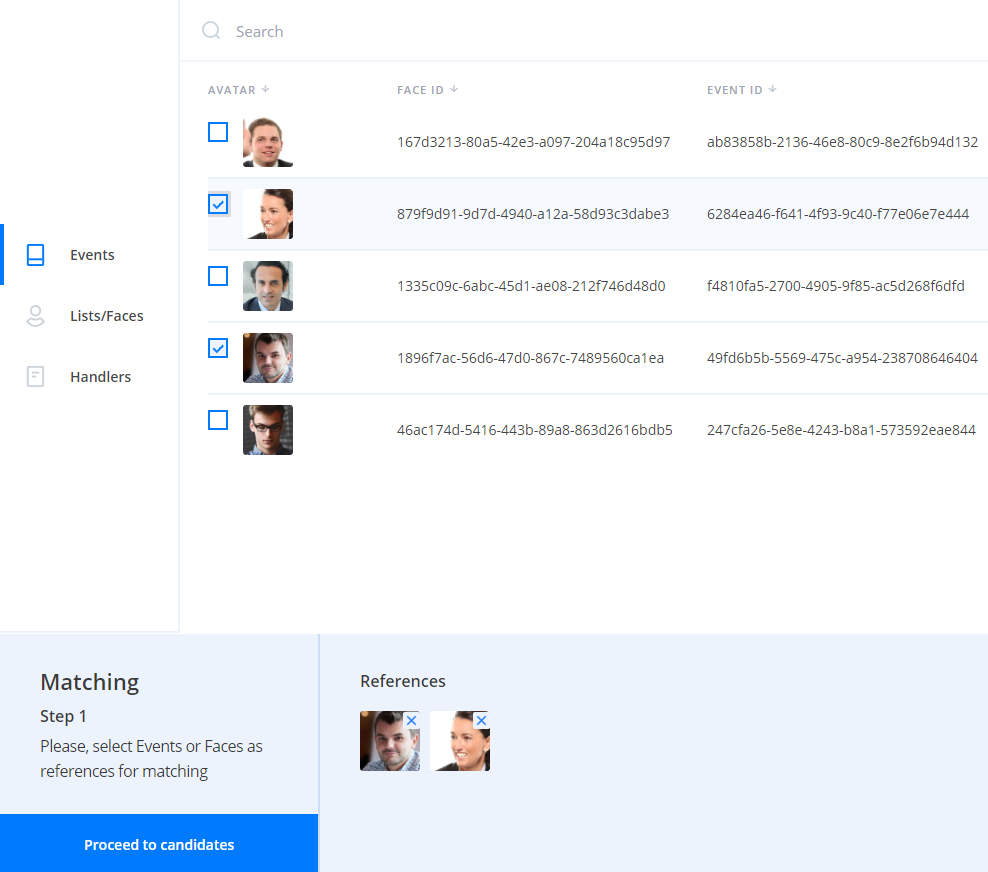
On the second step, you should select candidates for matching. You can select faces or lists as candidates.
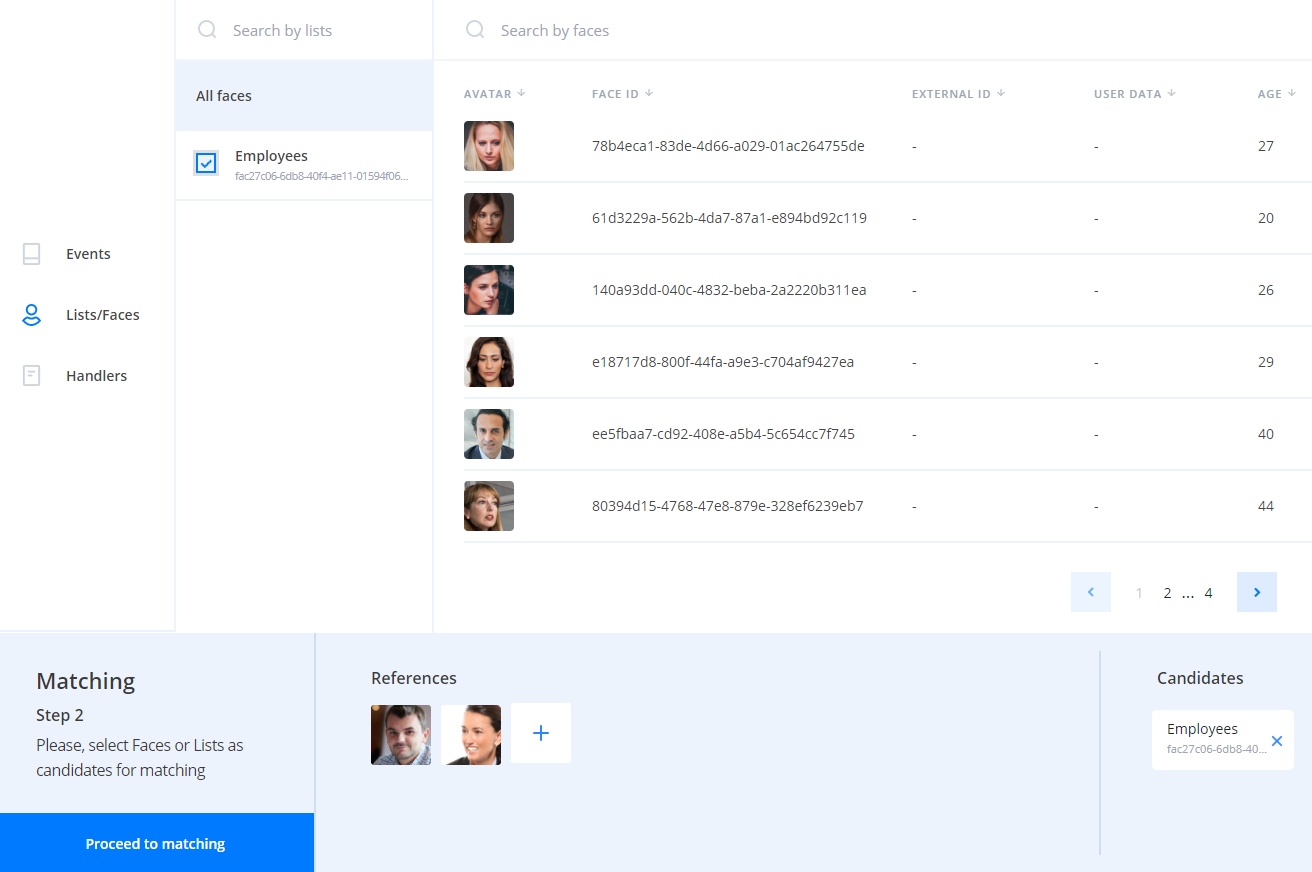
On the last step, you should press the Start matching button to receive results.
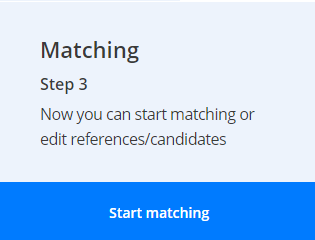
Resource consumption by services#
Below is a table describing the most significant resource consumption by services. The Remote SDK and Python Matcher services perform the most resource-intensive operations.
|
Service |
Most consumed resources |
|---|---|
|
Remote SDK |
CPU, RAM, GPU Remote SDK service performs mathematical transformation of images and extraction of descriptors. These operations require significant computing power. Both CPU and GPU can be used for calculations. Using GPU is preferable, because request processing is more efficient. However, not all types of video cards are supported. |
|
Python Matcher |
CPU, RAM Python Matcher performs a list matching. Matching requires CPU resources, but you should also allocate the maximum possible amount of RAM for each instance of Python Matcher. RAM is used to store descriptors obtained from the database. Thus, the Python Matcher service does not need to request each descriptor from the database. When distributing instances on multiple servers, the performance of each server should be taken into account. For example, if a large task is performed by several instances of Python Matcher, and one of them is on a server with low performance, the execution of the entire task as a whole may slow down. |
|
Postgres |
SSD, CPU, RAM |
|
Image Store |
SSD, CPU, RAM |
|
Handlers |
CPU |
|
Tasks |
RAM |
|
API |
CPU |
|
Faces |
CPU |
|
Events |
CPU |
|
Backport 3 |
CPU |
|
Backport 4 |
CPU |
|
Lambda |
RAM, CPU The amount of RAM depends on the size of the archive being transferred. See "Lambda service" section. |
|
Sender, Admin, Accounts, Licenses |
In normal scenarios should not consume a lot of resources. |